

The Ultimate Website Pre-Launch Checklist (Everything to Do Before You Hit Publish)
You've tinkered, tweaked, and poured your all into your brand new site and you're finally this close to hitting publish (woohoo 🎉), but before you do, one crucial last step is to make sure everything is actually polished, optimized, and ready to impress.
We see it all the time: beautiful sites that go live just a little too soon... broken links, SEO out the window, forms that don’t send, and images that slow everything down.
These are all flaws that can be pretty easily avoided, yet ones that can also have a pretty big impact on your site visitors' experience, meaning that they might navigate away and you might loose out on potential customers if your site isn't functioning at its very best!
So take a quick breather (step away from the launch button 😅) and go through our step-by-step final launch checklist. It only takes a little bit of time, and it’ll make sure your website not only looks amazing but also works perfectly, ranks better on Google, and gives your visitors the best first impression possible.
Let's dive in!

SEO Settings
If you want your site to actually show up in search results (and not just live in the void), these SEO settings are non-negotiable:
Add Your Site Title
This is a surprisingly easy one to miss (especially if you've started with a template!) but is totally crucial to not only let Google know what your site is about but also to make your site truly yours given that your site title will appear in browser tabs everywhere. And yes, you need to do this even if you've uploaded a logo!
To update your site title on your Squarespace site:
In editing mode, hover over your header navigation and click Edit Site Header
Then, hover over the title or logo and double click to access the settings panel
Here, you'll be able to upload a custom logo for desktop as well as mobile (if you want to), and most importantly update your site title!

You'll probably want your site title to be your business name or brand name, though you can also add more to it like a short description of your business to help with SEO!
This could include what you do or your location and might look something like this:
White Rose Photography | Wedding Photographer in AZ
Nebula Studio | Squarespace Website Designer
Make sure to keep it pretty concise or your site title will be cut off in search results!
SEO Descriptions & Alt Text
Just like your site title, adding SEO descriptions to all of your website pages makes it so much easier for search engines to know what your site is all about and can majorly help your rankings!
Squarespace has recently released a whole new SEO/AIO dashboard which makes managing this sooo much easier and you can access this directly from your main sidebar under Website.

In this dashboard, you'll be given a score for your SEO which is pretty handy to give you hints on what to improve.

If you click the Optimize button in the top right corner, Squarespace's own AI will generate some possible descriptions for all of your pages.
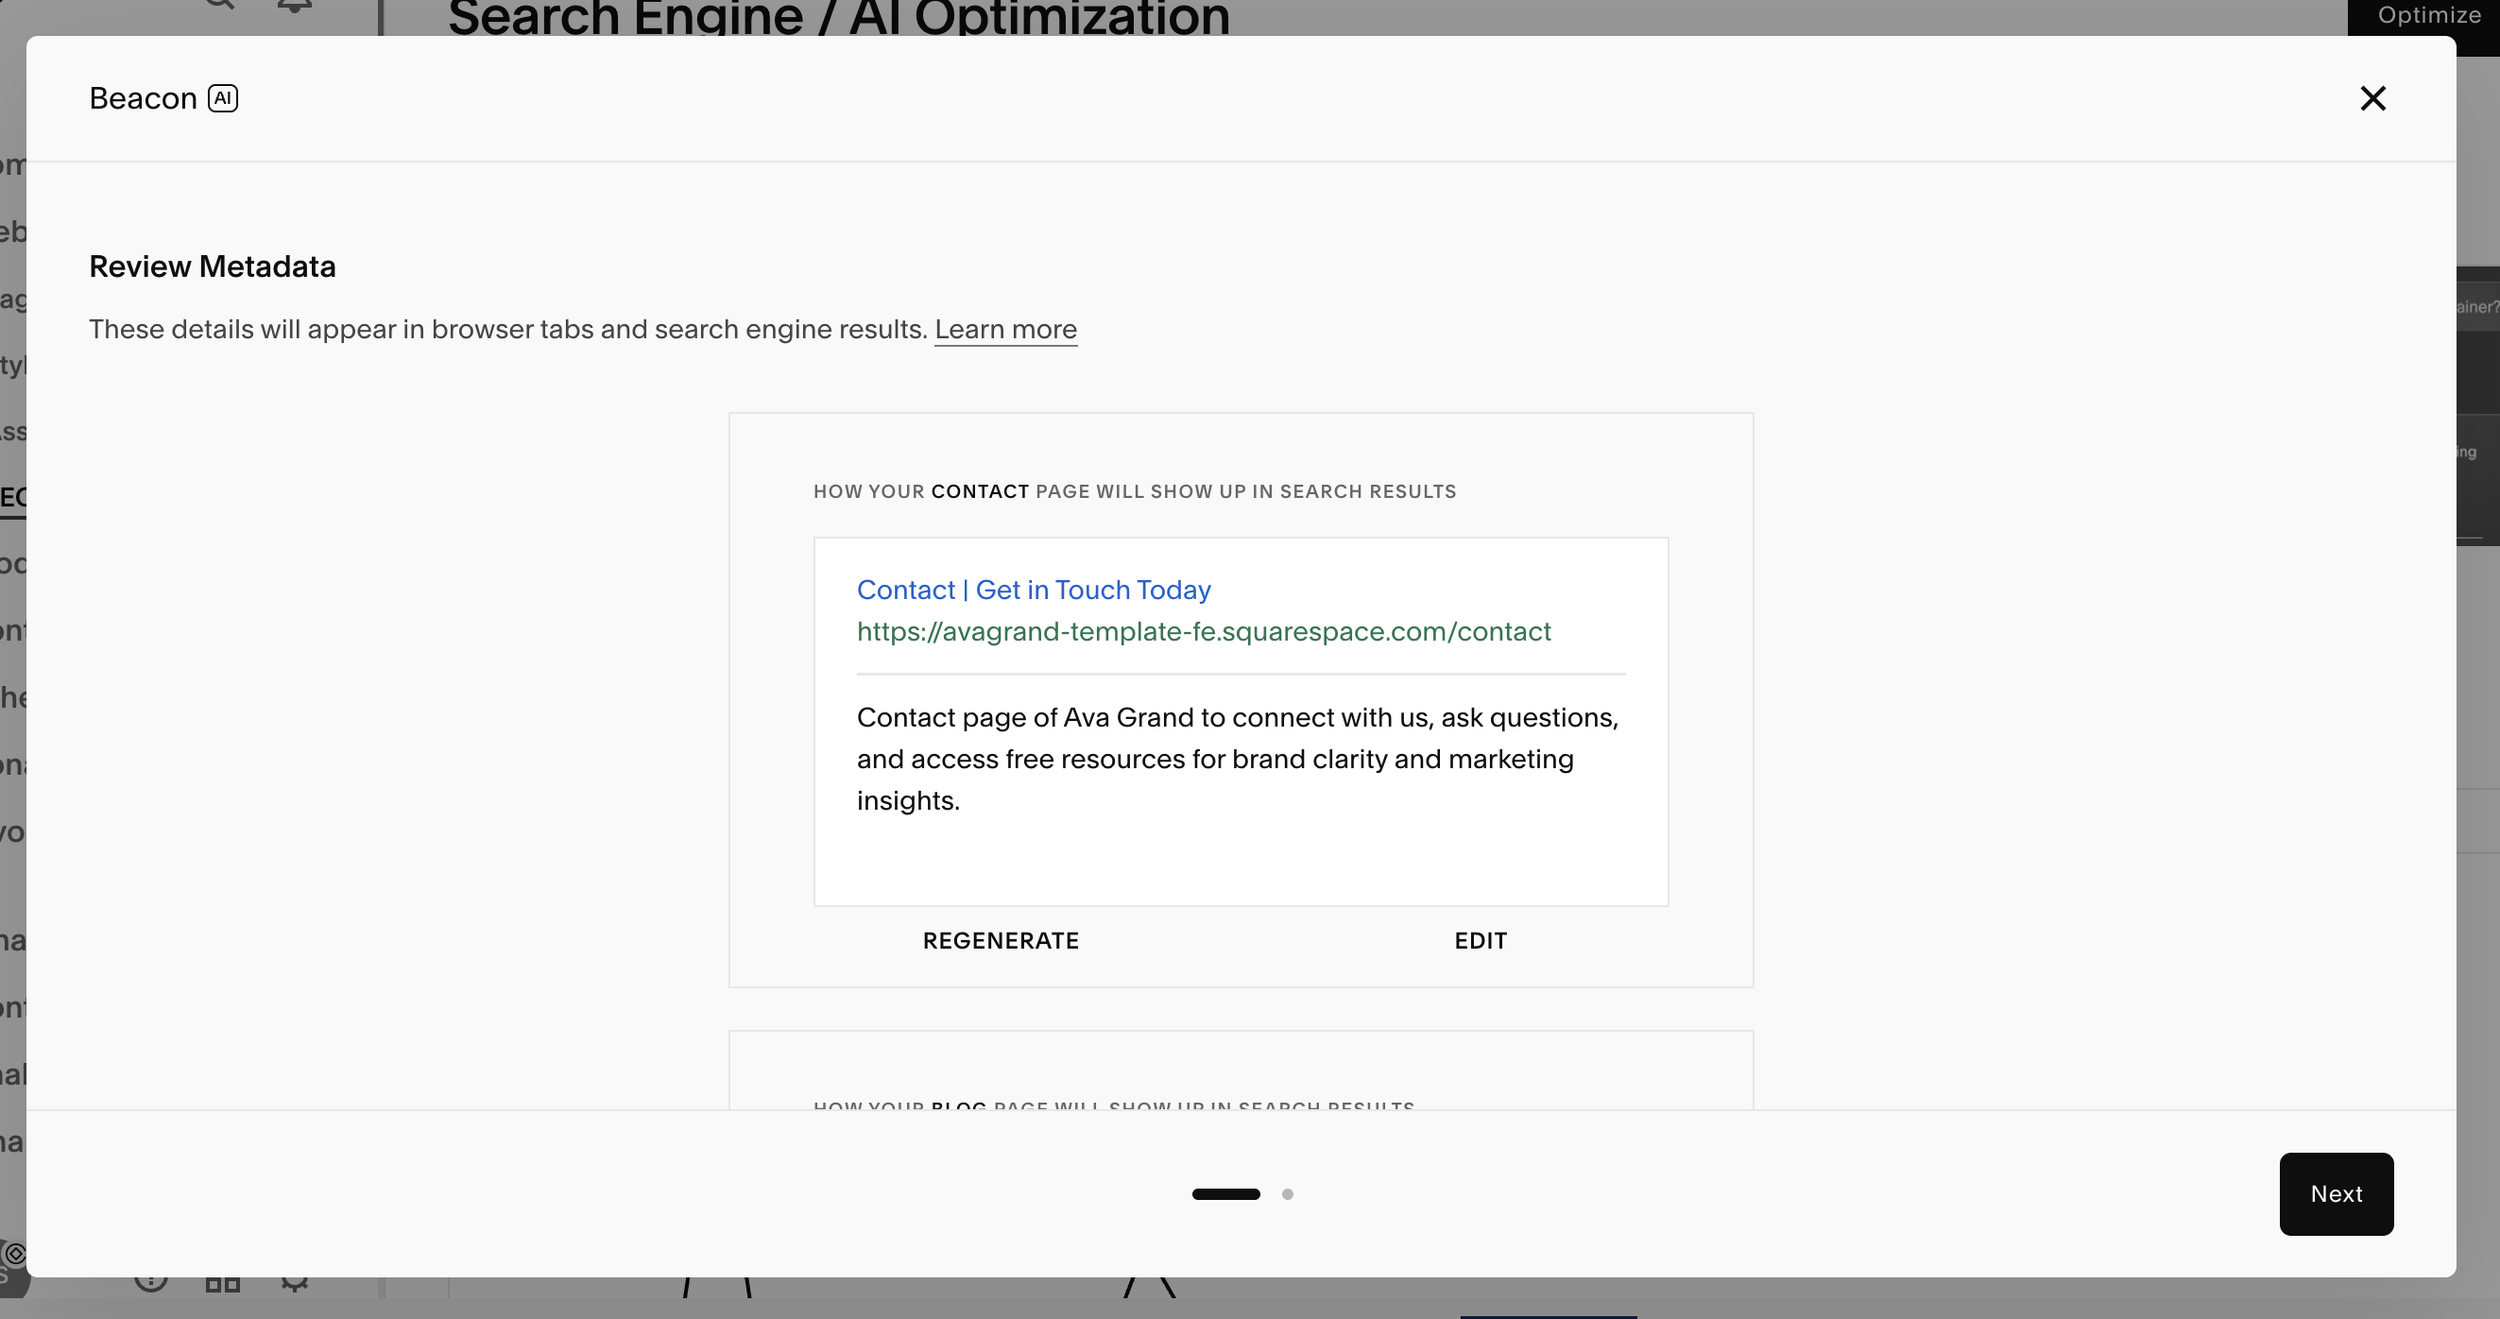
While it can be a massive timesaver, AI probably won't know your business as well as you do so if the auto-generated description isn't quite right on the first go, you can always click Regenerate or Edit to make updates yourself.
Once you're happy with each page description, click Next at the bottom of the panel and Squarespace's AI will generate alt text descriptions for your site images. This again gives search engines a whole lot more context regarding what your site is all about. It also greatly improves accessibility by allowing screen readers to describe images for visitors who are visually impaired.

Again, make sure to read through each description, click Edit to make updates or Regenerate to try again. Once you're satisfied, click Save in the bottom right corner.
Note! This tool will only generate descriptions for a max of 50 images at a time. If you have more images on your site, just click the Optimize button again and run the tool as many times as you like to watch your SEO score improve!
Site Description
In the same SEO/AIO panel, scroll down the dashboard to Tools to Manage Your Optimization and click on Search Appearance.

In the pop-up panel, fill out your SEO Site Description. This is the main description for your entire website (not the individual page descriptions you added earlier). It’s the short summary that appears under your site title in Google search results, so make it clear, keyword-friendly, and enticing enough to make people want to click!

Optimize URLs
Another place that search engines like Google actually get information is from your URLs (aka your page links eg. www.yourwebsitename.com/about).
That means that a page link like /12ufgj90 or /services-copy-3 will definitely not rank as well as a page with a clean, keyword-friendly and professional looking URL that clearly describes what the page is about and lets Google understand your site structure, for example /website-design-services or simply /about
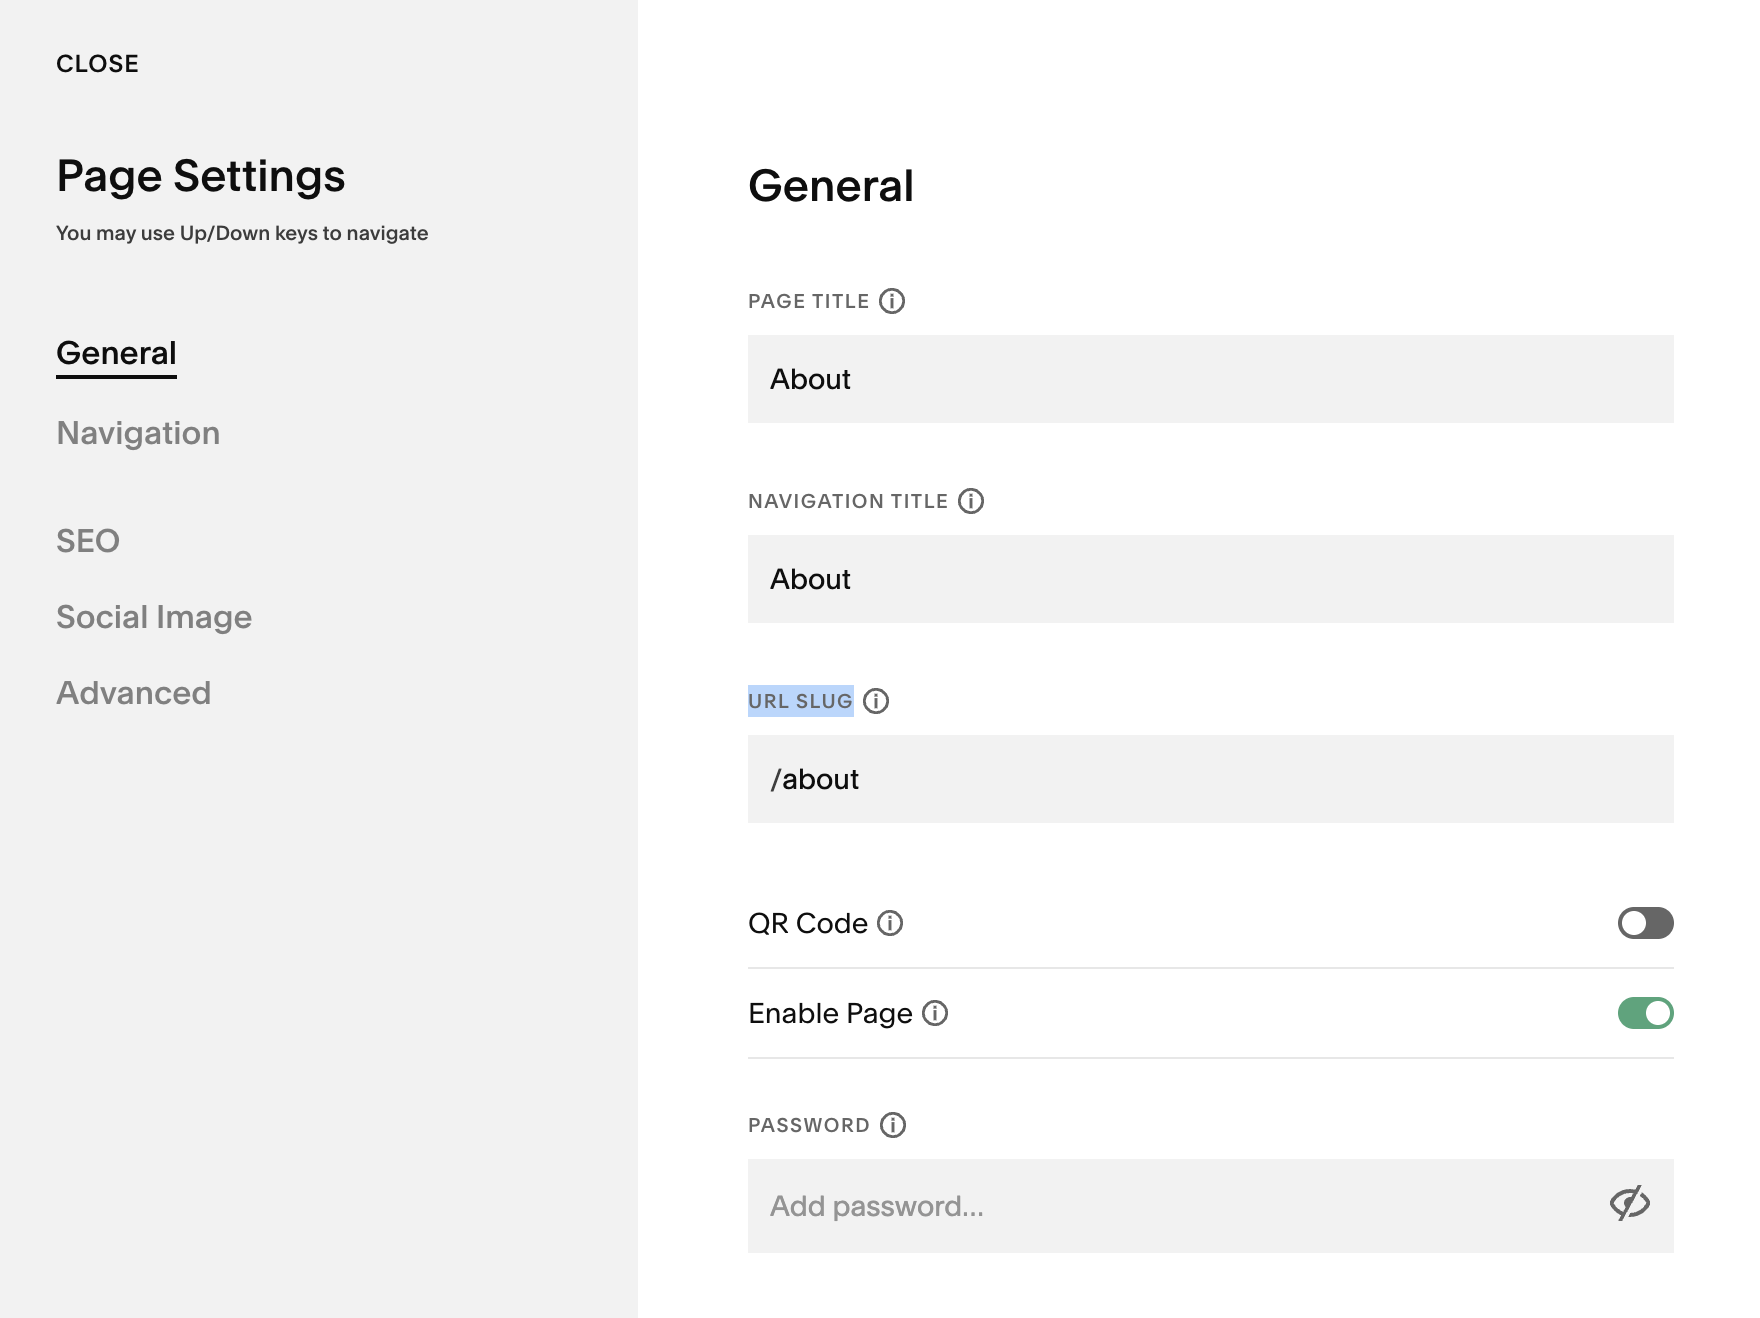
You'll be able to customize the URL slugs for each of your pages:
In your website sidebar, navigate to the Pages panel
Hover over a page and click the cog icon
In the Settings panel, customize the URL slug field
Note! If you've linked to this page anywhere around your site and you change the URL slug, this will result in a broken link which is a no no for optimizing your site! You'll either have to go through and manually update the link around your site or set up a URL redirect if you prefer.
Optimize Images
This one’s super important! Optimizing your images not only helps your site load faster (which visitors and Google love) but also gives search engines extra information about your content.
Naming your Images
We already talked about adding alt text to every image earlier in the post, but another important way to provide information is to make sure that each and every image that you upload to your site has been renamed appropriately too! Instead of IMG23770 make sure that your image name contains your business name, any relevant information about your business, and any relevant information about the image.
For example, this image on our home page is titled Big-Cat-Creative-Shop-Premium-Squarespace-Templates.jpg giving plenty of important information to Google to help us rank!

Don't worry, you don't have to reupload every single image because you can now rename your images directly within Squarespace! Just head to the Asset Library (Website > Assets in the left hand sidebar).

Find the image that you want to rename, click on the three dots in the right corner and select Rename. Change the name then hit Save!


Image Size
Google prioritizes websites that load fast and since large images can really slow down your site, making sure that all of your images are compressed appropriately before you upload them is an important step!
You ideally want to keep your images below ~500KB and we recommend running all of your images through a compressor like compressjpg.com or tinypng.com.
Design Settings
A few small finishing touches can take your site from DIY to pro.
Add a Browser Icon
By default, all Squarespace sites will have the iconic (and very generic) black square as their browser favicon.

A really easy way to make your site feel more polished and professional is to simply upload a custom one!
To add one, head to your website settings by clicking the cog icon at the bottom of the left hand sidebar menu, then click into Website > Favicon and drag your favicon design in to upload it!

👉 Check out our full tutorial on browser icons here
Custom 404 Page
We definitely recommend checking ALL of your links to make sure they are all working, but in the (actually pretty likely) event that you might accidentally forget one which results in a broken link and takes people to an error page, you might as well quickly set up a custom 404 error page that will keep people browsing on your site rather than feeling disappointed and clicking away.
Simply create a new page in the Not Linked Pages section of your site and customize it however you like. Some suggestions include adding a message like "Oops sorry this page no longer exists!" as well as buttons linking to other important pages like to your product or service, your blog or portfolio, a contact form so people can get in touch directly, or even a freebie sign up to keep conversions high!
Once your new page is ready, head to System Pages at the very bottom of your Pages panel, then to 404 Page.
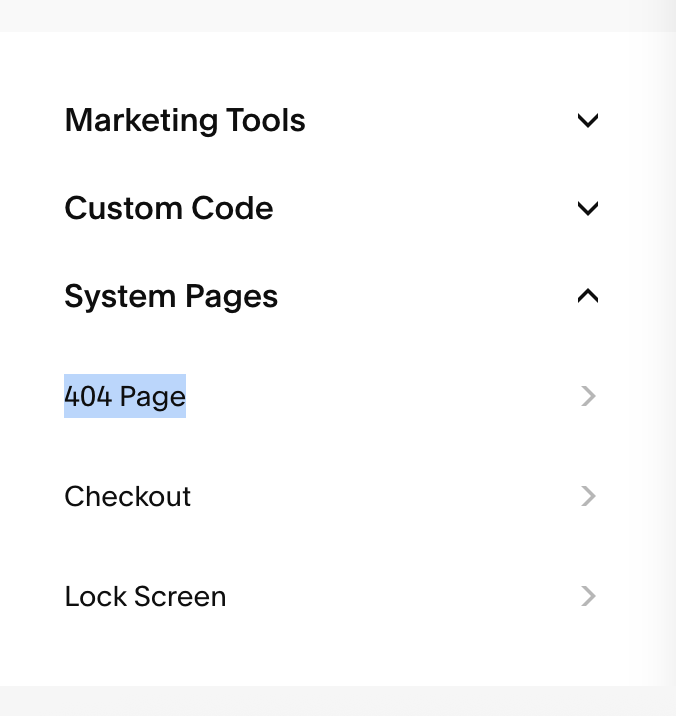
Then simply select your new 404 page that you just created in the dropdown!

Legal Stuff
You also need to make sure your website and site visitors are protected! Here's how:
Get a Privacy Policy
Having a privacy policy on your site is a must (legally!).
You can either hire someone to write one up for you, or you can use a template as a much more affordable option. There are tons of generator and template sites available these days like disclaimertemplate.com or termly.io, though you do want to make sure you are covered for your particular country and type of business, as well as ensuring that your site policy is GDPR compliant.
👉 How to add a Privacy Policy and Terms & Conditions to Your Squarespace Site
Enable the Cookie Banner
Another must to make sure your website is fully compliant is to enable the cookie banner!
To enable the cookie banner on your Squarespace site, head to your site settings by clicking the cog icon at the bottom of the left hand sidebar, then head to Website> Cookies and Data Privacy. Then simply toggle ON the cookie banner option and customize it from there!

Final Checks
We're getting closer! But hang on because there's just a few more important steps before you can officially hit launch!
Proof Read + Spell Check
Nothing says unprofessional like a big old typo! It’s important that you read over your whole site more than once. Even better get someone else to look over it because it’s hard to see your own mistakes sometimes!
Check All of Your Links
Go through your website and click ALL of your navigation, footer, buttons and any other links you have on your site to make sure they’re all working correctly.
View Your Website on Mobile
Squarespace websites will change when being viewed on different size screens. It’s good to check these just in case there are any problems. Check for things like your content displaying correctly, in the right order, everything being readable, etc. If your website isn’t mobile friendly, you will be losing a lot of traffic given that so many people browse directly on their phones these days!
👉 How to Edit Your Site for Mobile
👉 Hacks to Make Mobile Editing in Squarespace Fluid Engine Faster
Test Your Contact Forms and Newsletter Blocks
Test out your contact form by sending yourself a message to make sure it comes through ok. Test all of the forms on your website. Do the same things with your newsletter signup form if you have included one of these!
E-Commerce Shop Tests
If you have set up a shop on your Squarespace site, it’s important to make sure that your shop is up and running and ready to take payments!
Do a test run by going to Settings > Selling > Payments > Test Mode and then you can do a fake purchase! But make sure you turn this off before you launch your shop!
If you’re not using Squarespace for your shop, try reducing the price of your product (to something like $1) and doing a real test run before you launch!
Time to Launch 🎉
Have you made it through the list?? Amazing, you're ready to officially make your website live!!
Subscribe to a Plan
Before you can set your website live, you'll first need to subscribe to a Squarespace plan. There are several tiers to choose from so make sure to check out the breakdown for each one to see what's included and which one fits your needs best.
Once you’re ready, go to Settings > Billing & Account > Billing > Upgrade to select your plan and enter your payment details.
Connect Your Domain
Next, it's time to connect your domain, aka your website link (www.yourwebsitename.com).
Head to your website's Settings > Domains & Emails > Domains.

You have two options here:
If you already own a domain: Click “Use a Domain I Own” and follow the connection steps.
If you don’t have one yet: Click “Get a Domain” to purchase one directly through Squarespace. It’s super easy and keeps everything in one place.
👉 Read our full guide on connecting your domain to your Squarespace site here
Set Your Site Live
Once your domain is connected, the very very last step is to officially set your website live!!
Head to your website's Settings > Website > Site Availability

Then select the Public option.

That's it! Your website is officially live and ready to take on the (digital) world!
Launching your site is such a huge milestone (seriously, give yourself a pat on the back and break out the bubbly). You’ve just turned all your hard work into something real, and now it’s time to share it with everyone!
We hope this pre-launch checklist was helpful and if you've followed along with every step, you can now rest easy knowing that your site is out in the world at its very best and ready to drive conversions!
Want more tips for your website? Check out these posts:
How to Deliver an Opt-In Freebie Instantly in Squarespace
How to Upload a Custom Font to Squarespace
The Best Linktree Alternative: How to Create a Custom Link in Bio Page on Squarespace
How to Get Your Squarespace Website on Google: A 5-Step Guide
