

Your Complete Guide to Squarespace Member Sites
So, you've decided you want to share your expertise with your audience and create a member-only portal to host your virtual class, workshop, or podcast directly on Squarespace?! Well, you've come to the right place!
Creating a membership is a great opportunity to try your hand at earning passive income and building a community. It's also a great way to put all of your real-life experience and knowledge to use and build trust with your audience, and luckily Squarespace has a built-in tool for that! Introducing: Member Sites.
Member Sites is part of Squarespace's new Digital Products suite which includes Courses, Video Pages, and Member Sites, and allows you to place content behind a paywall so that only paying members can access it.
This means that you can manage subscription content directly in Squarespace. No more integrations or third-party platforms - you now have the option to manage both your website and sell your content all in the same place!
Squarespace is a good option to host a membership if you're already using Squarespace for your website, that way you have everything under one roof! If you're not already using Squarespace for your website or don't plan to, we'd recommend looking into using another membership platform as Member sites is only available to Squarespace users right now.
In this post, we'll walk you through everything you need to do to set up your membership directly on Squarespace so that you can start selling it asap!
If you'd like to use Squarespace but are not sure if you need the extra features (and price tag!) included in Member Sites, check out our other post on how you can host content behind a password-protected Squarespace page instead. This is a great technique for a membership site if you're just starting out or have little content and a small budget!
Ready to learn how to host a membership on Squarespace? Let's review the basics of Squarespace Member Sites and go from there!

WHAT IS SQUARESPACE MEMBER SITES
Squarespace Member Sites is a feature that allows you to create specific members-only pages on your Squarespace website. The content on these pages can then be accessed by those who pay for a membership. It's essentially like a VIP section on your site for paying members only!
Member Sites vs. Courses
Now you might be thinking that this sounds pretty similar to Squarespace's newly released Courses feature - and it is!
You can actually even have course pages within your Member Site, but while Member Sites can be used to host all kinds of content like special blog posts or podcast episodes, or libraries of videos or e-books, Courses is specifically designed for teaching and learning with content set up into modules and lessons.
👉 If you want to launch your own course, check out our full Courses tutorial
Pricing
To have a membership on your Squarespace site, you will need to have a Squarespace website Business plan or above starting at $23/month. This includes 30 minutes of video storage and a 9% transaction fee.
If you would like to increase your video storage and lower your transaction fees, you can purchase a Digital Product Add-On subscription which starts at just $9 per month in addition to your regular Squarespace website subscription.
Depending on the plan you choose, you can get up to 50 additional hours of video storage. Each website comes with 30 minutes of video storage for files uploaded directly to video blocks, video pages, and section backgrounds. You might reach this limit with your member site so you will need to upgrade your Digital Products subscription to get additional video storage, OR host your files on a third-party site like YouTube or Vimeo and embed them into the page.

Tip! Similar to Squarespace's regular website billing plans, if you sign up for an annual Digital Product plan, you can save up to 25%!
Make sure to check out the most up-to-date pricing via Squarespace here, as this information is updated frequently.
All plans include unlimited members, no ads or Squarespace branding and you can offer discounts and promotions. But aside from that, they don’t offer much more. It’s really just like adding a simple Squarespace page and paid customer accounts.
Now that we've reviewed the basics, let's dive into how you can set up Member Site on your website.

HOW TO ADD A MEMBER SITE ON YOUR SQUARESPACE 7.1 WEBSITE
Create your Member Site
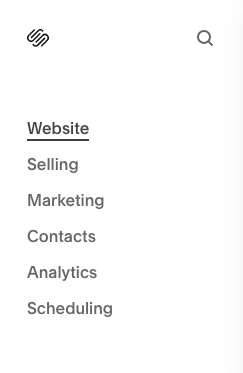
In your Squarespace website sidebar, click on Website to open your Pages panel.
Click on the + icon next to the Not Linked pages section, and select Member Site in the drop-down.


Next, pick a homepage template for your Member Site (don't worry, you'll be able to customize it later!).

This will create a Member Sites section in your pages panel and prompt you to rename your new Member site.

Once you've done so, click on your new Member Site to start adding pages!
Tip! Think of each member site as an individual membership. If you want to sell access to three different memberships, you will need to set up three member sites.
Click the + icon next to Member Sites to add more member sites to your website at any time.
Add content to your Member Site
Now that you have your Member Site set up, you'll want to add content to it.
The beauty of using Member Sites is that you don't have to learn a new platform interface as it works just like any other page on Squarespace. But instead of being freely accessed by anyone, any content that you add in your Member Site now lives behind a membership paywall.
Customize your Member Site Homepage
By default, the first page in your Member Site will be the homepage that you selected when creating your Member Site.
This homepage is your membership's landing page which your students land on when they log in. It should provide important information about the membership including what is included, upcoming classes or events, and anything else that might be helpful for your students.
You can customize it just like any other Squarespace page by clicking Edit in the top left corner.

If you prefer creating your own homepage rather than using Squarespace's pre-designed homepage, you can actually set any page that you create within your Member Site as a homepage by clicking the three dots to the right of its name and selecting "Set as Member Site Homepage" at the bottom of the pop-up menu.


You will be able to tell which page is currently set as the Member Site homepage as it will have a small house icon next to its name.

Add more Pages
In your Member Site main menu, click +Add Page and choose a page type.


You can add as many pages to your Member Site as you'd like. We'd recommend setting some time aside to plan how you want your Member Site to function, just like you did with your site! It's important that people who are paying for your product and/or service find your platform easy to navigate so they continue to renew and recommend it to others!
👉 How to edit in Squarespace 7.1 with Fluid Engine - Best practices & tips
Set up your pricing plan
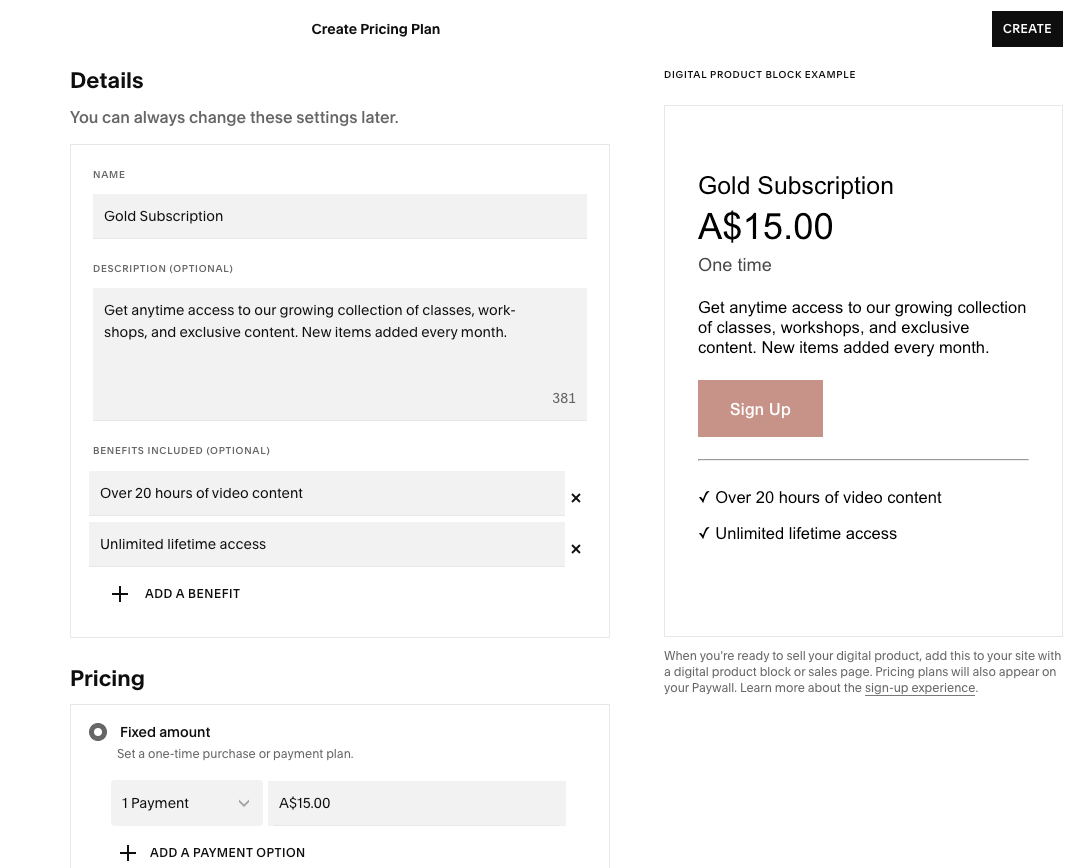
Back in your Member Site main menu, click on Pricing Plans and Create Pricing Plan

In the pop-up:
Name your Member Site
Add a description and benefits to show people what they'll receive with their membership (optional, but recommended!)
Enter the price you want to charge for your membership
You have the option to set it up as a subscription model, a fixed price membership, or even free!
Choose if you want to include any other Digital Products as part of the Pricing Plan (for example as bonuses)
Add set Enrolment Dates if you like
Finally, click Create in the top right corner
You'll now be able to see your new pricing plan in the list. Click the Pencil icon to edit it at anytime, or Create New in the top right corner to add a different Pricing Plan.

Configure your Member Site settings
You're almost done! The last thing to do is configure your Member Site settings so you can start selling!
Selling settings
In your website's left hand sidebar, go to Settings > Selling.
Here, you will find a multitude of important settings that you should go through to prepare your Member Site for sales.

Make sure to check through all the settings but here is a run down of the most crucial ones:
Payments: Select your store currency and connect a payment processor like Stripe or Paypal in order to be able to actually receive payments from your customers.
Customer Accounts: Make sure to toggle ON customer accounts so that your customers can create their login details at checkout
Checkout: Customize the checkout process, including receipt details, store policies, cart recovery, and newsletter sign up options.
Taxes: Set up the tax information for your store and whether you would like to charge a tax to your customers.
Customer Notifications
In your website's sidebar, go to Selling > Selling Tools then scroll down to the "Manage your storefront" section and click into Customer Notifications.

Here, you'll be able to customize the overall look of your emails to make them look right on-brand by clicking Edit Email in the top right corner.
Once you're done, click on Digital Products in the left hand sidebar to set up a welcome email for your member site.

Click Edit Email in the top right corner to edit the welcome email template.

This will bring you to a simple editor where you'll be able to customize the email text, add blocks, edit links, and more!

Remember to send yourself a test email to make sure everything is looking just as you'd hoped by clicking the Send Test button in the bottom right corner.
Note! The same welcome email will be send to all the digital products that you create on your site so make sure to keep it general as this includes all of your member sites and courses. You can also use placeholder text that will be automatically filled in depending on the information that you add in a particular pricing plan by clicking the last icon in the text toolbar.
This type of text will have a dotted line below it. You'll be able to choose from options like the customer's name, the course name, or the site title.

Member navigation
In your site's left hand sidebar, click the cog icon next to Member Sites.

In the pop up menu, select what navigation you would like your members to see when they are logged into your member site.

Manage Members
To view and manage your Member Site members, go to the Contacts tab in your site's main menu, then select Members.


HOW TO ADD A MEMBER SITE ON YOUR SQUARESPACE 7.0 WEBSITE
Create your Member Site
First, you need to activate the Member Sites feature on your website. You can find the Member Sites feature by going to Settings > Member Sites.

Then, turn the toggle ON to activate member sites.

This is also where you will find all the settings for your Member Site. When you're ready, click on Create Member Site.

In the pop-up, add your membership Name and enter the Price that you would like to charge for your membership.

Click Done in the top right corner to save the details.
This will create a Member Sites section in your pages panel.

Tip! Think of each member site as an individual membership. If you want to sell access to three different memberships, you will need to set up three member sites.
Click the + icon next to Member Sites to add more member sites to your website at any time.
Add content to your Member Site
To add a page to your Member Site click, you guessed it, + Add Page and choose a page type.

You can add as many pages to your Member Site as you'd like. We'd recommend setting some time aside to plan how you want your Member Site to function, just like you did with your site! It's important that people who are paying for your product and/or service find your platform easy to navigate so they continue to renew and recommend it to others!
Here are some tips on how to set up your Member Site in Squarespace 7.0:
Use a Blog to structure your membership like a course
With the Courses feature only being available in Squarespace 7.1, using a Blog to structure your content in a course-like fashion with each blog post being a different lesson is a great alternative
To use this method, create a blog page and title it with the name of your course or the particular module within your course depending on how you want to structure it.
Then create blog posts for each module or lesson within it - be sure to update both the blog post settings and the lesson content itself just as you would in a "normal" blog page.
You could use the main Blog Page as your course "home" page and use the blog posts for each lesson, eg:
Blog Page #1 (Course Home Page, access to all lessons)
Blog Post #1 (Lesson 1)
Blog Post #2 (Lesson 2)
Blog Post #3 (Lesson 3)

Or, if you want to create a course with 3 sections that each have 3 lessons, you would structure your blog post pages similar to the following:
Blog Page #1 (Course Section 1)
Blog Post #1 (Lesson 1)
Blog Post #2 (Lesson 2)
Blog Post #3 (Lesson 3)
Blog Page #2 (Course Section 2)
Blog Post #1 (Lesson 1)
Blog Post #2 (Lesson 2)
Blog Post #3 (Lesson 3)
Blog Page #3 (Course Section 3)
Blog Post #1 (Lesson 1)
Blog Post #2 (Lesson 2)
Blog Post #3 (Lesson 3)
If you use the above method and have multiple Blog Pages with different sections of the course, it's important to create a course "home" page that links to all of these different sections, so that your student can access everything easily.
Structure your membership or course with basic pages
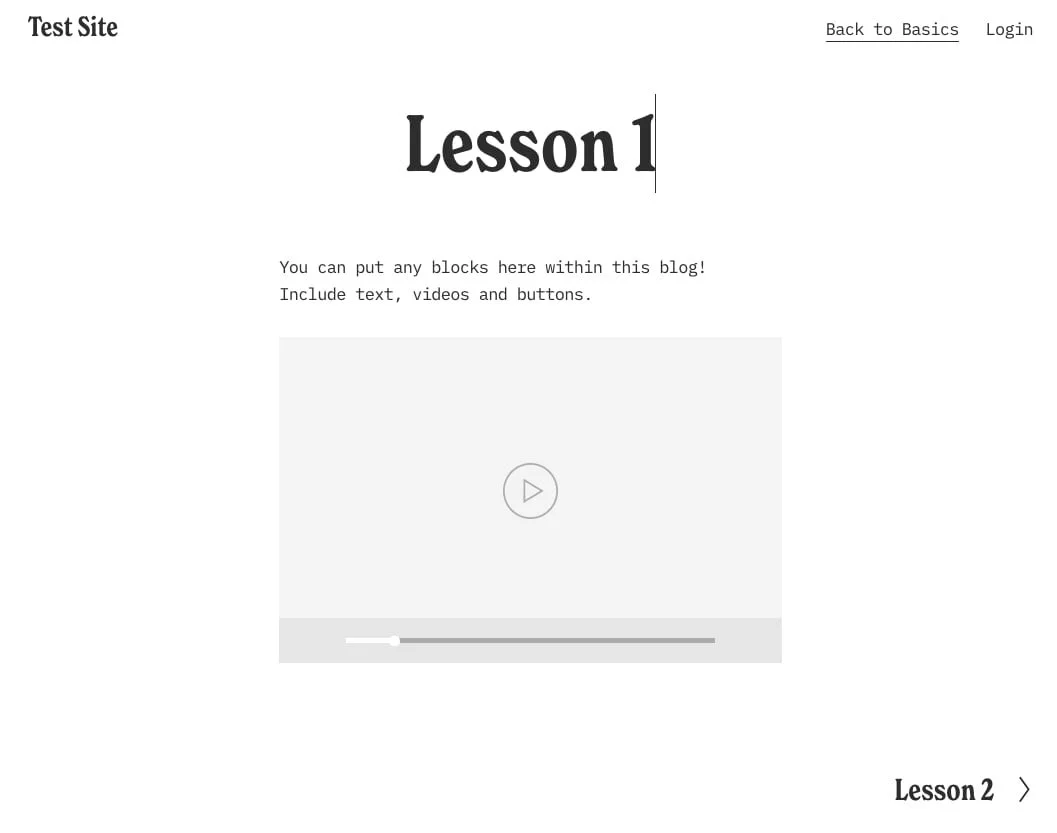
Another way to easily structure a membership or course in Squarespace is by creating individual pages for each section or lesson.
So for example, if we're creating a course about learning how to use Squarespace, we might title the first page, "Level 1: Squarespace Foundations," where we'll upload a few videos teaching our audience about the basics of using Squarespace. Then we'll create another page titled, "Level 2: Creating a Page in Squarespace," where we'll upload content specific to that topic, and so on and so forth 🙂
If do you use this method, it would be good to create a "course home" style page where you have links to each different lesson so people can have access to all of the lessons from one point.


Important! Set your home page
Whatever method you choose to structure you course, make sure to 'set' your course homepage. This will be the page that someone lands on when they login to the course.
Click the wheel/cog icon next to the page you want to be your course homepage:

Scroll down and click "set as Member Site homepage"

Configure your Member Site settings
You're almost done! The last thing to do is configure the settings of your Member Site so you can start taking orders.
Head back to the Member Sites panel by going to Settings > Member Sites.
On the menu, you'll see shortcut links to all of the global settings that you will need for your Member Site. As you can see, there are quite a few, but we'll walk you through them to make things a little easier!

Manage Members
First up is Manage Members. Here you'll get an in-depth look at your subscriber base. As you grow your offerings this can be a great place to come back to so you can better understand your customers and include them in your marketing strategies.
Payments
Next is Payments. This is an important one!
This is where you will connect your site to your preferred payment processor - Stripe or PayPal so customers can actually submit their payment to become a member.
Discounts
If you want to create a special deal for customers you can set them up under Discounts. You can set up promotions in a few different ways (offering either a percentage or an amount off of the price), which can be a great tool to entice sales of your course!
Taxes
This is pretty self-explanatory, but under Taxes you'll be able to manage how and where your business collects taxes on your sales. Customize this according to your business type and local regulations.
Accounting
Under Accounting, you can download reports related to your memberships to better understand your sales.
Customer notifications
Customer Notifications is where you can set up customized welcome and cancellation emails.
The Membership Welcome email is sent when a customer registers a membership. Conversely, the Membership Cancelled email is sent when a customer cancels their membership.
These are templated, but you can edit them to reflect your global website styles (colors, fonts, etc.) and customize the subject line and preview text.
Commerce settings
Commerce Settings is a shortcut taking you to the Commerce hub for your website where you'll find an overview of everything commerce related. There are a number of Commerce Settings you can play with, but the main one you'll want to include in the set up of your course is enabling customer accounts.
This will allow those who sign up for your course to create an account with you to then easily access their content and also renew or cancel when the time comes.
ENABLE CUSTOMER ACCOUNTS
To enable customer accounts:
Go to Settings > Selling > Customer Accounts (or access via Commerce Settings)
Flip the toggle ON to activate this option.

Member navigation
Lastly, we have Member Navigation. This is where you will manage what navigation menu members see when logged into their customer account on your site.
There are two options available - Show in Customer Account Panel, or Don't Show Navigation - depending on how you want your customers to be able to navigate around your membership pages.

Show in the Customer Account Panel: After a member logs into their customer account, the Login link in your main navigation will change to Account. Users can then click this to open up a Customer Account panel and view all the pages included in their membership.
Don’t Show Navigation: This option hides the member area page links from both the main navigation and the Customer Account panel. If you choose this option, I'd recommend creating a custom member navigation on a page so users can still navigate around your member area easily.
HOW TO SET UP A LOGIN LINK
Your customers will need a Login link to access their membership content. The way this appears works a bit differently depending on what site version you're using.
Squarespace 7.1
If you're using Squarespace 7.1, the account login link will display automatically in your site's navigation once you enable customer accounts.
The link text style follows our site's header styles and displays as 'Login' or 'Account', depending on if an account holder is logged out or not.
Note: It's not possible to edit the text of this link.
You can also add a login link manually anywhere around your site by link to /account/login
Squarespace 7.0
If you're using Squarespace 7.0, the account login link will display automatically in your site's navigation on most templates once you enable customer accounts.
If you're using a template where it doesn't display, you will need to manually add the link:
Add a link to your site's main navigation menu using the URL formula: /account/login
The /account/login link brings visitors to the homepage and displays the login window.
👉 You can check which version your site is on with these instructions.
DESIGN YOUR MEMBER SITE SALES PAGE
You've created all of your great member site content and set it up on Squarespace and are ready for subscribers...but how do they sign up? Great question! The final step in the process of launching your Member Site on Squarespace is to create a landing page.
Think through how to best position your new membership on your site - maybe it's by creating a brand new page dedicated to it or maybe it's as simple as adding a new section or two to an existing page on your website.
Don't want to build a landing page from scratch? Check out our plug-and-play, strategically designed Sales Page Templates for Squarespace 7.1.
Either way you'll use Digital Product Blocks to give your customers a place to sign up for your Member Site. You can add these to any page, blog post, or content area on your site where you want to promote your courses and memberships.
In order to use Digital Product Blocks, you'll need to make sure you've done the following:
Enable Member Sites and purchase a Squarespace subscription.
Configure your Member Site settings to accept Payments via Stripe or PayPal.
Build out at least one member site under the Member Sites section of the Pages panel, and set up a Pricing Plan.
Adding a Digital Product block follows the same process as any other block on Squarespace, but we'll walk you through a few ways you can add them to your site.
Adding a Digital Product block
To add a Digital Product block:
Navigate to the page or section you want to add your membership information to.
Click Edit in the left corner and then +Add Block > Digital Product.

Double click on the block to access its settings.
In the Content tab, select one of your Member Sites pricing plans from the Choose a Pricing Plan drop-down menu.

Next, switch over to the Design tab to customize the block's alignment and edit the details that appear in your block. You can choose to turn on or off the following membership details:
Title
Description
Price
Benefits
Button - you can also customize the text of the button below it under Button Text

Tip! We don't recommend removing the Price from the Member Sign Up block because it's important that prospective members know what exactly what they're paying for your membershop. If you do want to remove it, we recommend adding the price of your course to the description to make sure it's somewhere!
Adding a Digital Product section
Alternatively, you can add a pre-designed Digital Product section. These are a great foundation for content that you can also easily customize.
When adding a section to your page, scroll down to browse the different Digital Product layouts that you can customize. These have the Digital Product blocks built-in so all you will need to do is tweak them to your liking!
The built-in sections are great if you have multiple member sections you want to share so your customers can compare and contrast all membership options.

While there are limitations with every hosting platform, Squarespace no doubt makes the entire process of setting up and hosting a membership very easy, especially if you're familiar with Squarespace already.
For more tutorials, check out the posts below! 👇
How to add a BUY NOW button for your course in Squarespace
Should you host your course on Squarespace? Pros, Cons, Alternatives
How to embed course videos from Youtube to Squarespace (for free!)
If you liked this post, Pin it to Pinterest! 👇🏻
