

How to manage images and files in Squarespace - Your complete guide to the Asset Library
Squarespace has made some exciting updates to their image library, now known as the Asset Library, making it more useful than ever! 📚
This handy tool automatically saves any image that you upload to your Squarespace site via Image Blocks or wherever else you can add images on your site (Galleries, Thumbnails, Background Images, etc) so that you don't have to keep uploading the same images over and over again to reuse on your site.
It now comes with even better ways to keep tabs on and organise your website content, and is well worth learning how to use to keep your site as optimised as can be! 🤓

How to access and use your Asset Library
You can now access your Asset Library directly from your Squarespace site's main menu, in the left hand sidebar.

This will open up a library of all images you've ever uploaded to your Squarespace site.

How to add and manage images
Here, you'll be able to add new images in bulk by clicking the + ADD NEW button in the top right corner.
You'll also be able to create Folders to organise your images, which, if you're big fans of keeping everything tidy and organised like us, is a very exciting new feature 😂
Keeping your images organised in Folders is ideal to retrieve the images you need super quickly later on and will save you a ton of time searching around for them.
You'll even be able to create Folders within Folders to keep the back end of your site as tidy as can be!

To move images into Folders, select the images you'd like to move and click the Folder icon appearing at the bottom of the page. You'll be able to select which Folder (or Folder within a Folder) you want to move your selected images to.

Deleting images
By clicking the Trash icon next to the Folder icon, you'll be able to easily delete multiple images at once.
Don't worry, this is not totally permanent as your deleted images will be moved to a Trash folder where they will be stored for 30 days before being deleted permanently.

If you change your mind, you'll be able to recover your images before the 30 days pass, by clicking the Restore button at the bottom of the page, or deleting them permanently by clicking Empty Trash or the trash icon 🗑️
Note! If you try to delete an image that is currently used on your site, a warning message will pop up. Deleting images that are currently used is not ideal as this will create a broken file on your site that will need to be replaced!

Keeping your images optimised
When hovering over any of your images in your Asset Library, you'll also see three dots. By clicking on this icon, you'll be able to access the File Details for each image.

File details are particularly helpful to check file sizes to make sure all of your images are perfectly optimised!
All of your images should ideally be below 500KB to improve your site's speed, and should be renamed appropriately to improve your SEO!

While renaming and editing images isn't an option within the Asset Library just yet, we hope this is something Squarespace will make available to us soon 🤞 In the meantime, you'll need to optimise your images externally and reupload them to Squarespace. This can be a little time consuming (though well worth it for your SEO) and is another reason why we recommend optimising all of your images from the get-go!

How to access and use the Asset Library on your site
You'll be able to access your Asset Library whenever you go to add an Image on your Squarespace site. This includes Image Blocks, Thumbnails, Galleries, or Background Images, anywhere on your site.
To access your Asset Library, click + to add an image, then choose SELECT FROM LIBRARY.
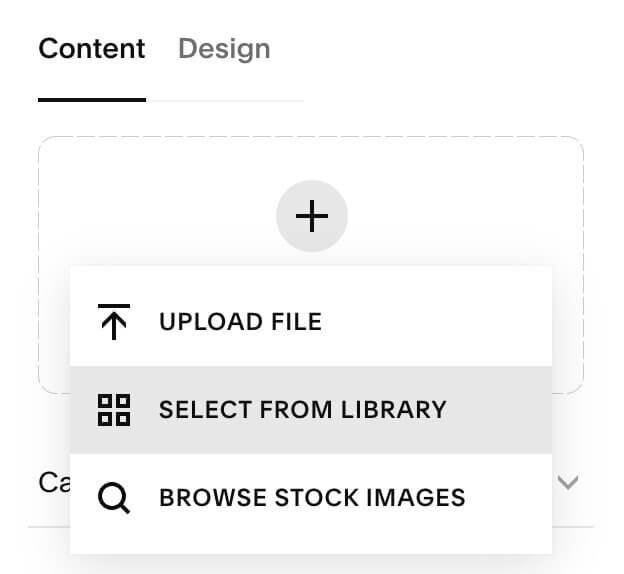
This will open up your Asset Library, and you'll be able to pick any image that you've previously used or organised into Folders ✨
If you're adding a Gallery, you'll be able to select multiple images at once, which will save you a ton of time, especially if all your images are neatly organised!

You'll also be able to use the search bar at the top to search for particular images. This is where renaming your images comes in handy too!
Additionally, you'll be able to choose whether you want to select images from your own Library, or from Squarespace's built-in integrations with Unsplash (for free stock images), or Getty (for premium, paid stock images).


Even better, any stock images you end up using on your site will be automatically added to your own Library so that you don't need to spend a ton of time browsing to find them again!
How to upload and manage files in Squarespace
What if you want to upload something like a PDF file so people can download it? At this point, this isn't something that the Asset Library supports.
But that's OK! Squarespace actually has an area where you can upload and manage all sorts of files, including PDFs and docs. You'll then be able to add a link for visitors to directly download those files from your website.
If you plan on using custom code on your website, you will likely also want to be able to upload images and files into the backend of your site so you can get the image URL.
Log into your Squarespace website and then go to any page.
Add a text block anywhere on that page (literally anywhere, as we will delete this at the end).

Type anything in the text box (eg “jdskljf” 😂).
Highlight this text and add a link by clicking on the link icon in the text formatting toolbar.
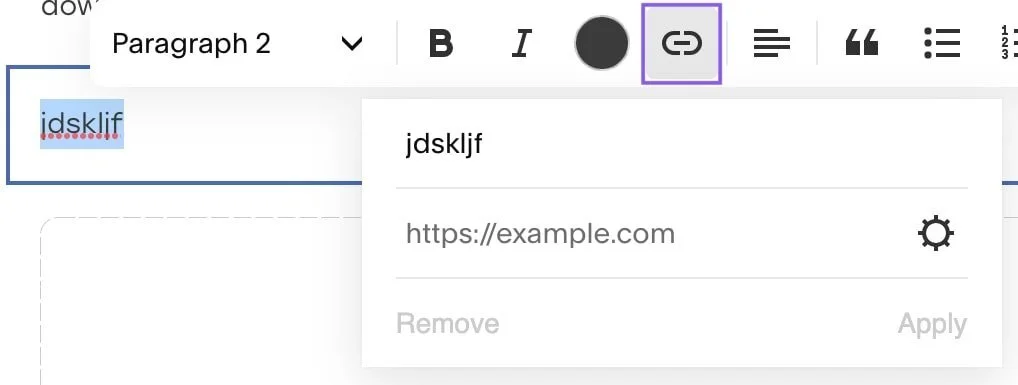
When you click the link button, a small window will appear. Click the COG/WHEEL icon on this window.

This will open another window. Click the FILE tab in this window.

And there it is, your Files Library!
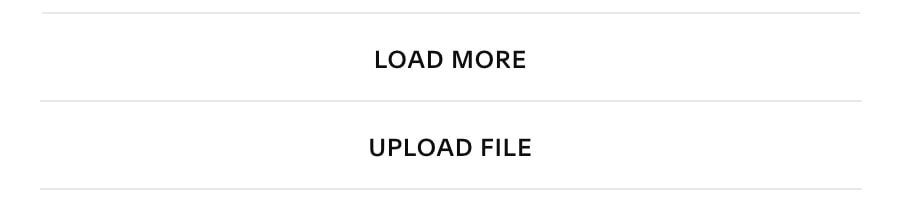
You'll be able to see a list of existing files you have uploaded (you probably have none, we have lots!).
Use the UPLOAD FILE button to add a new file.
Accessing this area might seem a little bit confusing. But basically, the only way you can access this File Library is when you’re creating any link.
Eventually we hope this Files area will be added to the Asset Library, but right now it remains here.
So anytime you are adding a link around your site, you will see that COG/WHEEL Icon and you will be able to access this Files Library.
Note: The only reason we added that text link was to get access to this file area. But the file and the link aren't connected in any way. You can remove or add any files to this file area. Every file you upload here will be stored here until you delete it. If you remove the link, the file will still remain in your files area.
Once you have uploaded your file, you can click CLOSE in the top left corner, and remove the link + text block. You don’t need to hit “save” on the link or the page! The file will already be uploaded and saved into your Files Library.
Anytime you need to access your Files Library, just add or edit a link somewhere, and all of your existing files will remain safely in there 😇
How do I upload a file for someone to download in Squarespace?
Add a text link, or you could add a link to anything link-able (eg. an image or a button)
Click on the cog
Click on file
Make sure your file is uploaded into your File Library
Click on the file you want to use as your download, then click save in the top left corner of the panel
This will add your file to your link
Click save/apply on your link
Click save on your website page
Then when people click this link on your website, the file will download for them instantly
If you want to have a file as a download opt-in freebie, read this post about how to create an instant opt-in download in Squarespace.
If you are using the files in a code and want the URL, you can use:
/s/yourfilenamehere.jpg
Make sure you use the complete, correct file name showing in your Files Library!
Squarespace keep adding and improving features that make designing and keeping your website organised easier and easier, and we're 100% here for it and ready to share it all with you!
If you want more Squarespace tips, check out the posts below👇
Hacks to make mobile editing in Squarespace Fluid Engine faster
Your complete guide to Image Focal Points in Squarespace
How to redirect Squarespace forms to a freebie or thank you page
How to host a course on Squarespace - Complete guide to Squarespace Member Areas
How to resize and crop images in Squarespace 7.1 Fluid Engine
If you liked this post, Pin it to Pinterest! 👇🏻
