

How to Start a Blog with Squarespace in 2024
If you’ve been thinking about starting a blog, there’s a good chance that you might be feeling overwhelmed by all of the different platforms, resources, checklists of what you should and shouldn’t be doing, and so on.
But fear not! In this post, we’ll walk you through why blogging is so important for your business and provide a straightforward how-to for creating your blog from scratch using our favorite website platform, Squarespace.
If you’re not already familiar with Squarespace, check out this post 👉 Why we Recommend Squarespace for Small Business Owners
We love Squarespace for blogging because it’s basic enough for a beginner or DIY user to start with, but it’s also robust enough to keep up with your growing business (for when you go big time, ya know?!). And we know Squarespace really well, so you can take our word for it when we say that this is THE platform for beautiful, simple, and functional blogs.
Let’s dive in!

Why blogging is so important for your business?
To kick things off, let’s talk about all the reasons why blogging can be so very important for your business.
1. Boost your SEO
Blogging is a great way to enhance your online visibility and generate organic traffic to your site.
Posting consistently and regularly replacing or updating older posts with new information can improve your search engine rankings and help you stand out on Google. And the same goes for keywords. The more you are able to effectively integrate keywords into your posts, the easier it will be for search engines to index them and display them in their search results.
If Google can see that your posts are actually relevant to what people are searching for, you bet they’ll be pushing your content!
👉 The ultimate blog post SEO pre-publish checklist
2. Establish authority and expertise
It’s so crucial to build trust with your audience and let them know that you have a vast and legitimate knowledge of the industry you’re in!
Creating blog posts that are not just informative, but also clearly well-researched and comprehensive will position your business as an industry leader. People will start to refer your content to others because they trust that it’s the best.
Sharing your well-earned expertise and unique insights in a creative and community driven way can build so much credibility for your business.
3. Engage and retain customers
Creating valuable content for your audience is the best way to keep them coming back for more!
Blogs are great for addressing customer pain points and providing solutions. If you know what your audience or customer-base needs, YOU can be the one to provide it for them before anyone else using that expertise we talked about above. And when someone lands on a post of yours that really resonates, they will be more likely to continue browsing your content and engage with the rest of your site.
4. Build a community
When you put a blog post out into the world, you’re creating an opportunity for people to discuss and learn.
Comments and shares allow your audience to expand even further beyond what’s in the actual post. They are able to hear from others, engage in thought exchanges, pass on the knowledge to someone who might really need it, and more. Having that sense of community makes your blog a place people want to be!
5. Support your marketing strategies
Blogging is the perfect partner for marketing strategies like Social Media and Email Marketing.
Blog content can be repurposed in so many different ways. You can break-up or shorten a post and use it in a social caption, you can turn the written content into a fun video, or even send the information out as a newsletter.
Sharing content in all of these different ways diversifies your audience and helps drive traffic from social media over to your blog/website, and vice versa!
👉 How & why you should repurpose your blog content
6. Generate leads and conversions
Blogs are a great way to convert visitors into customers.
It’s so easy to incorporate call-to-actions (CTAs) and lead magnets within your blog content using links, buttons, sign-up forms, and more, and if you structure things the right way (and again, use that one-of-a-kind expertise), you’ll be able to lead your kind of curious readers through the sales funnel straight into taking motivated action!
Creating a Blog in Squarespace 7.0 and 7.1
Setting up a blog in Squarespace is really quite easy, and thankfully, the first couple of steps are the same in both Squarespace version 7.0 and 7.1!
To add a blog to your website:
Navigate to Website > Pages
Click the “+” icon to add a new page to either your Main/Primary Navigation or Not Linked section
Choose Blog from the pop-up

NOTE! In version 7.1 you will be prompted to choose a layout for your main blog page. Pick whichever layout you’d like, it can easily be changed if needed.
Next, enter a name for your new blog page and then click anywhere or hit “enter” on your keyboard. This will take you directly into the blog’s backend panel where all blogging will happen!
Program your blog settings in Squarespace 7.0 and 7.1
Now let’s take a look at some of the blog’s main settings.
To access these, click on the cog icon to the right of your blog page title.

A Blog Settings window will pop up. Most of the settings you’ll see aren’t super important when you’re just starting out and can be left as is, but it’s good to know that they exist just in case you need to adjust something further down the road!

The main settings that you’ll want to check/adjust are:
General
URL SLUG: You’ll want to make sure that this is something clear and simple like /blog or /posts as it will show up in your main website URL for every single blog post. You shouldn’t name this after a specific category or topic as you’ll be able to specify that for each individual post later on.
POSTS PER PAGE: This is where you can control how many blog posts will appear at a time on your main blog page. You can use the slider to adjust the number according to your preferences.
SEO
SEO DESCRIPTION: We highly recommend adding an SEO description to your blog. This is the description that people will see when your blog shows up in Google (you will see a little Google preview when you write your description). Here you can write a sentence or two describing what your blog is about.
Advanced
POST DISPLAY (only in Squarespace 7.0!): When people land on your main blog page, do you want them to be able to see a full post right away or just a small excerpt of a post? Most people will choose to show an excerpt here so that a visitor can land on the main blog page and get a feel for each post before choosing which one they want to read from there, rather than immediately being able to view the full contents of the most recent post. You can toggle this on and off later if you’re not sure what the difference is.
MANAGE TAGS / CATEGORIES: Even though you actually add Tags and Categories to each blog post individually, you can manage all of them at once in this settings section. For example, if you wanted to delete an entire Category - instead of going through each blog post to delete it one by one, you could remove it from every post with one click in this section.
If you’ve adjusted any of these settings, be sure to his Save when you’re done!
Blogging in Squarespace 7.0 vs 7.1
Once you’ve created your main blog and are ready to start adding posts, it’s important to note that you’ll find some functional and design differences between Squarespace version 7.0 and version 7.1.
If you’re not sure which version you’re using, check out this post to help you find out 👉 Which template/version/editor am I using?
Once you know this information, it will make following the rest of this guide much easier for you.
Blogging in Squarespace 7.1
First, let’s walk through everything you need to know for blogging in Squarespace version 7.1!
In your main blog panel, you’ll notice three separate tabs or sections: Pricing Plans, Blog Overview and Blog Content.

Blog overview
The Blog Overview page is like the “home page” for your blog. This is where visitors can get an overall look at what type of content you post, sort through categories, view popular posts, and more.
The amazing thing about the Blog Overview page in Squarespace 7.1 is that you can customize it like you would any regular page on your website. Meaning, you can add as many additional sections as you’d like to fill out the page and make it super interesting and interactive for your site visitors.
You can also adjust the way your blog posts are displayed, which allows for much more freedom and creativity!
Customizing the blog overview page
Click “Edit” in the top left corner to enter editing mode and then hover over the existing blog post section and click “Edit Section” in the top right corner

In the Format tab, under “Layout”, use the dropdown menu to navigate through the different layout options. You can choose from Basic Grid, Side By Side, Single Column, Masonry and Alternating. (see screenshots below for examples of a few of the layouts)


Leon Template using the Alternating Layout
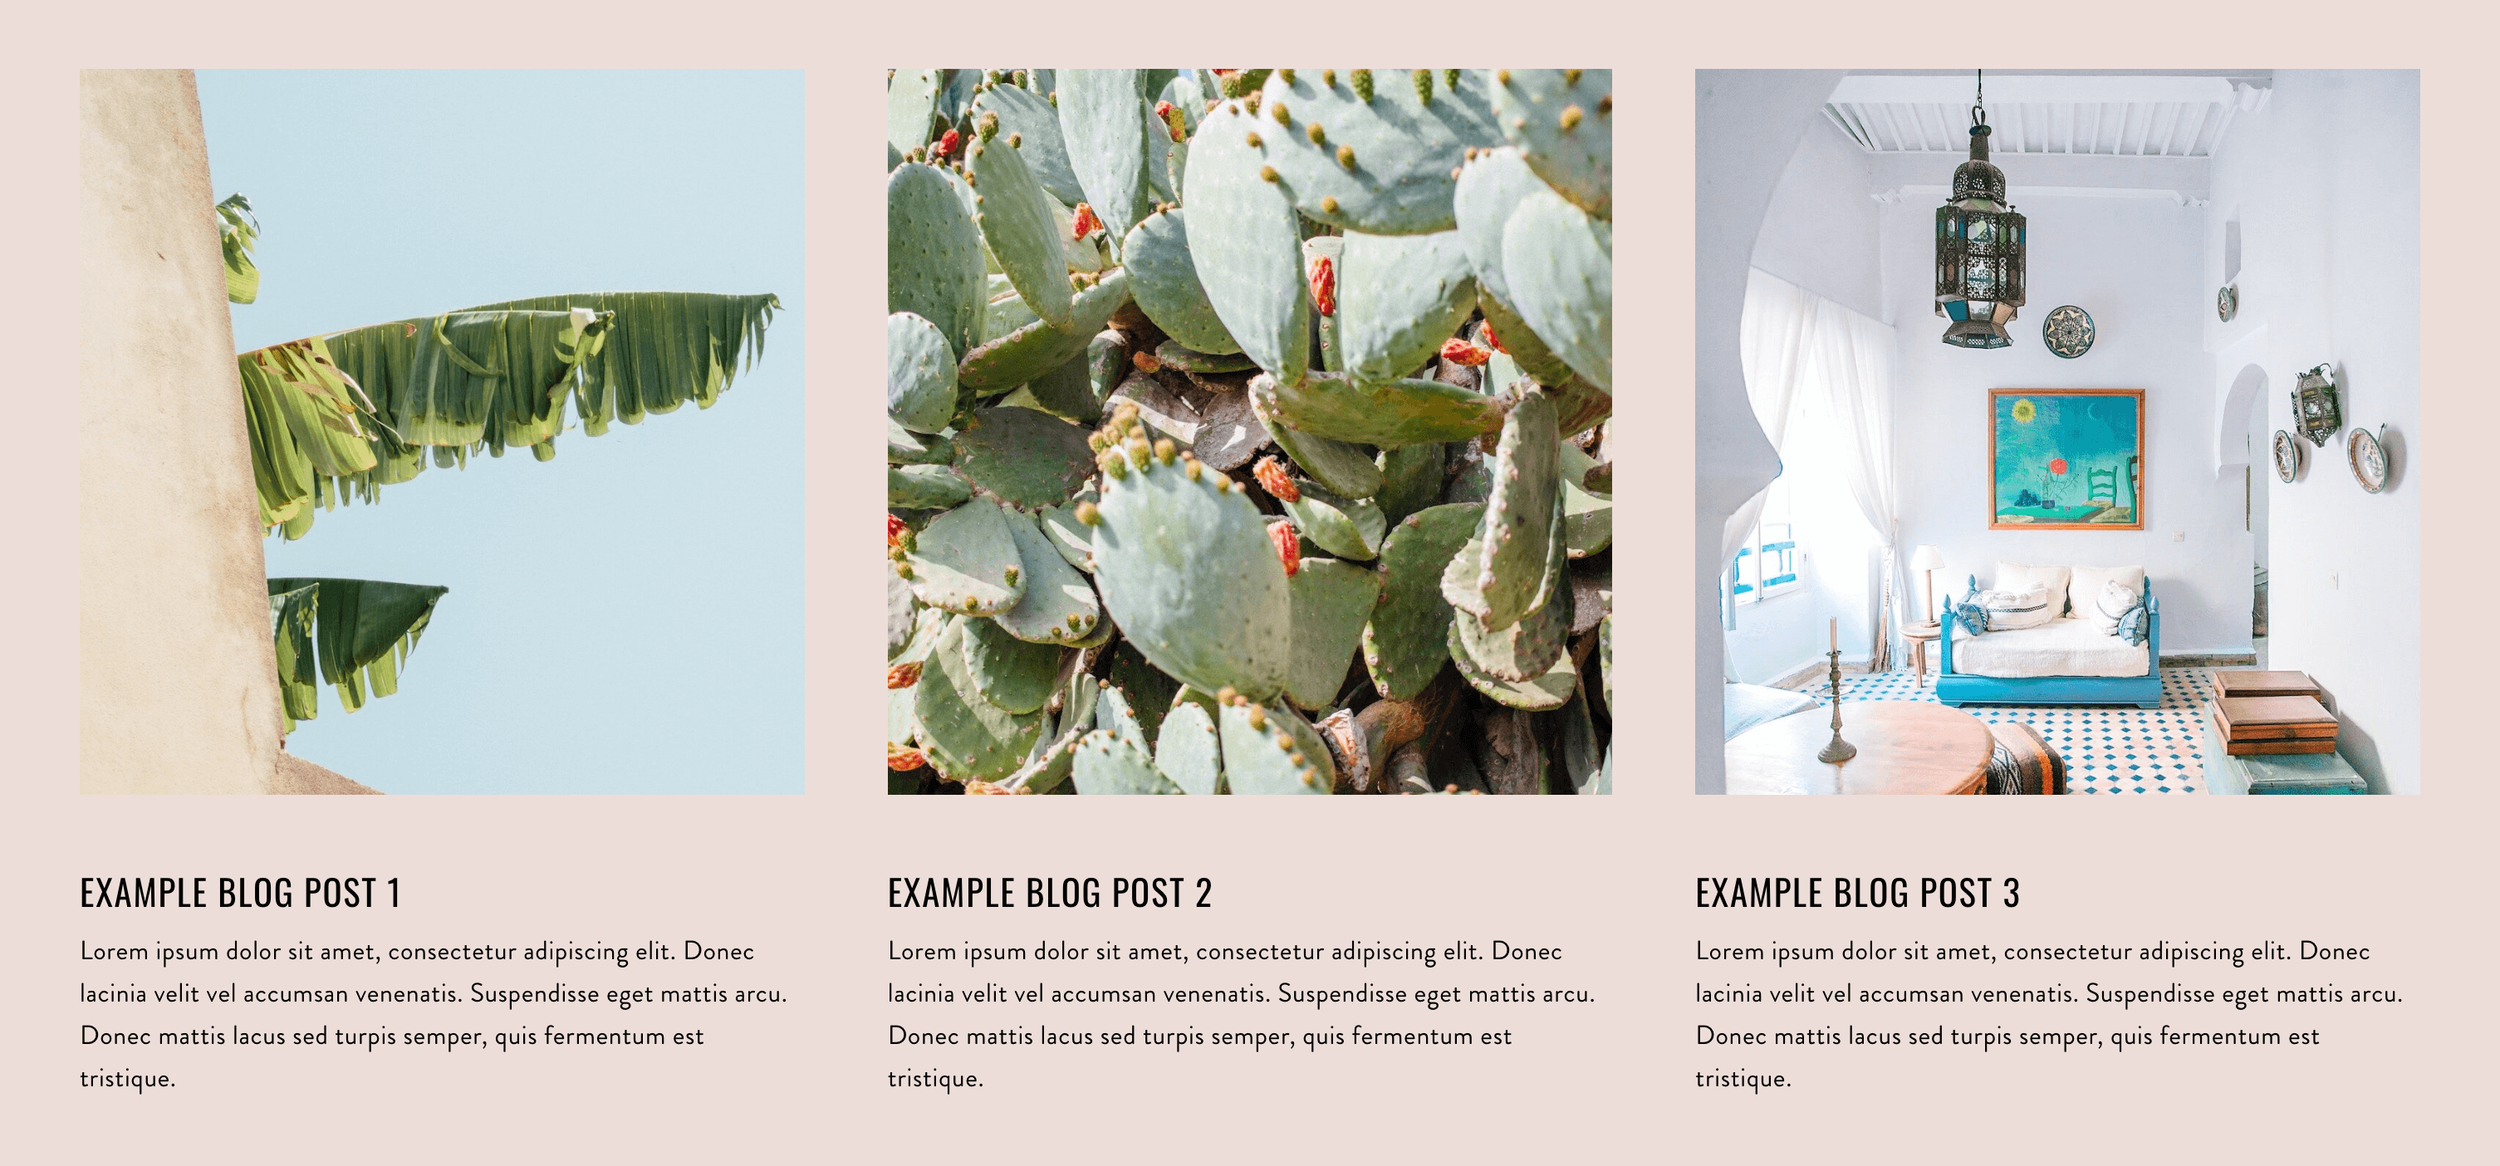
Ventura Template using the Basic Grid Layout

Shelley Template using the Masonry Layout
Depending on which layout you choose, there will be additional design options to customize like spacing, image ratio, text, and much more. You should really take some time here to play around with the settings and experiment with the different options until you find something you love!
In the Colors tab, you can then select one of your existing color themes to apply to that section.

If you’d like to customize the colors for this blog post section even further, you can do so by following these steps:
Click on the Site Styles paintbrush icon in the top right corner of your screen
Click on “Colors”
Choose the color theme you’re using
Scroll down in the theme’s panel until you find the Blog Layout sections (there will be a section for each of the 5 layout options)
Here you can further customize the colors of your text, meta data, links, etc.

Once you’re happy with how the blog post section looks, you can start filling out the rest of the Overview Page by adding page sections above or below, just like you would anywhere else on your website. You can add things like an intro section, a popular posts section, a freebie download section, a newsletter sign-up section, etc.

Blog content
The Blog Content tab is where you can manage all of your individual blog posts. Any post that you’ve created, whether it’s still a draft, scheduled for another date, or fully published, will show up in this tab.
You can search for a specific post using the search bar at the top or filter through your drafts, scheduled posts and published posts using the “Filter by” dropdown.

You can also select individual posts or multiple posts at a time by clicking on the box to the left of a post. You’ll then have the option to Delete selected posts or move them to a different blog or collection (if you have multiple).

Adding a new blog post
Click on the “+” icon at the top right corner of the Blog Content tab to add a new post.

A new post will automatically open up in editing mode. You'll be able to directly edit the post title and body text, just by clicking on those blocks, while in editing mode, and typing! Easy, right?
To further edit the look and structure of your blog post, hover over the post and click on “Edit Section” in the top right corner.

Under the Format tab, you can adjust the width, alignment and spacing of the post and toggle on and off some additional elements. Under the Colors tab, you can select one of your existing color themes to apply to the post.
If you’d like to further customize your blog posts colors, you can do so by following these steps:
Click on the Site Styles paintbrush icon in the top right corner of your screen
Click on “Colors”
Choose the color theme you’re using
Scroll down in the theme’s panel until you find the Blog Post section
Here you can further customize the colors for titles, meta data, and more.

Important! These blog post settings apply to ALL of your blog posts, not just the one you are on at that moment.
To finish up customizing your new post, you can play around with adding additional blocks!
The cool thing about Squarespace blog posts is that they’re completely editable and customizable, meaning that, beyond the title and body text, you can add any blocks you want to the page. Images, videos, text, buttons, etc. are all able to be added and moved around. This allows each post to remain fun and engaging (rather than just having plain and boring text).
Keep in mind that, currently, ALL Squarespace blogs use the Classic Editor. Even if you’re in version 7.1! If you’ve never used the Classic Editor, use this guide to familiarize yourself with adding additional blocks to your blog post.
Editing your blog post settings
To open up the settings for an existing blog post, find the post in your Blog Content tab and click on the three dots to the right of the name. Then click “Settings”.

A Blog Post Settings window will pop up for that particular post. You should access and check these settings every time you add a new blog post!

Let’s walk through the most important settings here:
Content
FEATURED IMAGE: Think of this as your post’s thumbnail. This is the image that will display on your Blog Overview page, along with the post title and any other info you’ve decided to make available. This image will also be shown if your post is shared to social media.
EXCERPT: If you would like to show an excerpt of your post on the Blog Overview page, this is where you’ll enter it. If you don’t include anything here, nothing will show when the excerpt option is turned on. Including an excerpt is also good for SEO, so we always recommend writing one regardless of if you plan to show it or not!
POST URL: We recommend customizing the post URL and keeping it down to a few words. Squarespace will automatically use the title of the blog post for the URL, and sometimes the title can be lengthy! The post URL can be something like a simplified version of the title or even just some good keywords 👉 Squarespace SEO Tip: How to optimize your URL slugs (& why you should)
DUPLICATE: This can come in really handy if you want to make a blog post template and then duplicate it for each new post.
Options
STATUS: This is where you can choose when and how your blog post goes live. You can keep the post as a Draft (as long as your post is a draft, it will not show up on your Blog Overview page), mark it for Review if you have a team of authors/editors that review content, Publish it so that it’s immediately live on your blog, or Schedule it for a later date and time.
TAGS + CATEGORIES: Both of these things are great for organizing your posts. Categories should be used more sparingly and can be broad (ie: Breakfast, Lunch and Dinner on a recipe blog), while Tags can be used more liberally and cover more specific things like keywords, month/year, specific subject matter, etc. We mostly recommend creating Categories for your blog! Tags can be left blank if you don’t feel that you need them.
COMMENTS: Here you can choose whether or not you want to allow comments on a post. This is entirely up to personal preference, and can be decided on a post by post basis if you’d like. You can also turn comments on and off site-wide (for all blog posts) in your Squarespace settings by going to Settings > Website > Blog Preferences > Comment Settings.
FEATURED POST: You can set a post as a Featured Post if you want to highlight it in a summary block. You can do this with your most popular posts, your newest posts, or just some posts that you want to push out to people more than others.
SEO
SEO TITLE + DESCRIPTION: We will generally leave the SEO Title blank, as it will just pull in your blog post title. If you would like this to be something different, however, go ahead and create a custom one! For the SEO Description, an easy hack is simply copying in the excerpt that you wrote in the “Content” panel, and make sure keywords are included!
Those are the main settings that we look at when adding a new blog post. The remaining tabs don’t tend to be as necessary or important, but you should definitely look through them so that you are familiar with them just in case!
Pricing plans
In Squarespace 7.1 you have the option to monetize your blog by placing it behind a paywall so that visitors have to pay in order to access your content. Under the Pricing Plans tab, you can create a pricing plan with features like:
The option to charge either a one-time fee, payment plan, or ongoing subscription fee
The ability to include digital products or downloads along with your pricing plan
The option to set sign-up dates and deadlines to create excitement and demand around accessing your content


Once you create a pricing plan, you’ll be able to place the information on a sales page or individual section of your website so that visitors can easily learn about your offer and sign-up conveniently!
Blogging in Squarespace 7.0
Blogging in version 7.0 is a little bit simpler. You don’t have the option to add a paywall and the available customizations are more limited, which means the majority of the focus is on your wonderful content. So, let’s go ahead walk through everything you need to know for blogging in Squarespace version 7.0!
Adding a new blog post
Click on the “+” icon at the top right corner of your main blog panel to add a new post.

A new “Edit Post” pop-up will appear that should look something like this:

This is where you’ll begin creating your new post!
Content
Everything under the first Content tab is pretty self-explanatory. You’ll enter your post title where it says “Enter a post title…” and in the main white box where it says “Write here…”, you’ll write your post.
You can also add additional blocks throughout the post by clicking on the blue plus sign icon that appears above or below any existing block (just like you would on a regular 7.0 page).

This is just to get you started. You’ll be able to view your blog post as it will actually look on your website and make tweaks to the blocks and content before publishing (we’ll go over that a bit later).
At the very bottom of the Content tab, you’ll find a few additional options:

Add Tags and/or Categories by clicking the “+” icon next to each option. Both of these things are great for organizing your posts. We mostly recommend adding Categories which can cover broad topics (ie: Breakfast, Lunch and Dinner on a recipe blog), while Tags can be used to specify more specific things like keywords, month/year, subject matter, etc. and can be left blank if you don’t have a ton of content.
You can choose whether or not you want to allow Comments on a post. This is entirely up to personal preference, and can be decided on a post by post basis if you’d like. You can also turn comments on and off site-wide (for all blog posts) in your Squarespace settings by going to Settings > Website > Blog Preferences > Comment Settings.
Click on Draft to see a list of post visibility options. You can keep the post as a Draft (as long as your post is a draft, it will not show up on your main blog page), mark it for Review if you have a team of authors/editors that review content, Publish it so that it’s immediately live on your blog, or Schedule it for a later date and time.
Options
Under the Options tab you’ll find some more important settings to customize for your post.

FEATURED IMAGE: Think of this as your post’s thumbnail. This is the image that will display on your Blog Overview page, along with the post title and any other info you’ve decided to make available. This image will also be shown if your post is shared to social media.
POST URL: We recommend customizing the post URL and keeping it down to a few words. Squarespace will automatically use the title of the blog post for the URL, and sometimes the title can be lengthy! The post URL can be something like a simplified version of the title or even just some good keywords.
EXCERPT: If you would like to show an excerpt of your post on the main blog page, this is where you’ll enter it. If you don’t include anything here, nothing will show when the excerpt option is turned on. Including an excerpt is also good for SEO, so we always recommend writing one regardless of if you plan to show it or not!
FEATURED POST: You can set a post as a Featured Post if you want to highlight it in a summary block. You can do this with your most popular posts, your newest posts, or just some posts that you want to push out to people more than others.
SEO
The SEO tab is, of course, where you’ll find those all-important SEO settings.

SEO TITLE + DESCRIPTION: We will generally leave the SEO Title blank, as it will just pull in your blog post title. If you would like this to be something different, however, go ahead and create a custom one! For the SEO Description, an easy hack is simply copying in the excerpt that you wrote in the Options tab.
Those are the main settings that we look at when adding a new blog post. The remaining tabs don’t tend to be as necessary or important, but you should definitely look through them so that you are familiar with them just in case!
And at the very bottom of the “Edit Post” pop-up (regardless of which tab you’re in), you’ll always have the ability to:
Cancel the post if you want to discard the work you’ve done or just save your changes and exit.
Delete the post entirely.
Duplicate the post if you’ve created a template or want to follow the same structure for another post.
Save the post, which will automatically save your changes and close out the pop-up window while keeping your post a draft.
Save & Publish the post, which will automatically save your changes and make the post live.
Further customizing your blog post
Previously, we mentioned that you’ll be able to view your post as it actually looks on your website and make some additional design tweaks if needed before fully publishing.
This is great because sometimes you just need to see the full picture, and it’s a little trickier to do that when working in the small pop-up window where you started!
To do this, once you’ve added all of your post settings, go ahead and click “Save” at the bottom of the “Edit Post” pop-up. Make sure that you do not click “Save & Publish” so that your post will remain a draft.
After you click “Save” the pop-up will close and the new blog post draft will show up in your main blog panel over on the left side.

You can then click on the post’s name so that the post itself opens on your page. To edit the post on the page, vs in the pop-up window, hover over the page and click “Edit” (just like you would when editing any other section in 7.0).

You’ll then be able to edit any of the existing content as well as add new blocks wherever you’d like! And when you’re happy with your changes, click “Save” to exit.

When you’re ready to publish your post, or if you need to make any edits to the post’s settings, you can click on “Edit” to the right of the post’s name in the main blog panel. This will open up the “Edit Post” pop-up where you can adjust your settings.

Customizing your main blog page
Now that you know how to add and customize a new blog post, you’ll want to make sure that your main blog page (where all of your individual posts are displayed) is taken care of.
The catch here is that the look and available features of your main blog page depends on the Squarespace 7.0 template that you’re using. So, since there’s no way for us to know what that is, it’s a little tricky to show you exactly how to edit and customize this page.
The good thing is that, no matter which template you’re using, you’ll look for your design options in the same place so let’s go over how to do that!
To view your main blog page, click on the name of your blog at the top of your main blog panel.

You can also navigate back into your Pages panel and click on your blog wherever it is in your navigation.
Keep in mind here that if you don’t have any “live” or published posts yet, then your main blog page is going to be completely blank. It might be helpful to publish a few posts before attempting to customize this page so that you can actually see the changes you’re making!
Blog page intro
While looking at your main blog page, hover your mouse around the top of the page toward the bottom of your site header. You might see a black bar appear that says “Intro” and next to Intro you can click “Edit”.

Again, this might depend on which template you have, so if you don’t see this option, then you don’t have the ability to make these customizations.
Here you’ll be able to add any text or additional blocks that you'd like in order to create a nice welcome or intro section for your blog.
Site styles
Another way to customize this main blog page is through your Site Styles.
To access your Site Styles
Head back into your main Squarespace menu
Navigate to Website > Design > Site Styles
Scroll through the Site Styles panel until you find the BLOG settings, or type “Blog” into the search bar to be taken straight there

Important! In version 7.0, only Site Styles for the page that you’re currently viewing will be shown. Because of this, you’ll want to make sure that you’re on your main blog page when you navigate into your Site Styles panel. If you aren’t, you won’t be able to find these Blog settings!
Once you find your Blog settings, you’ll be able to scroll through and play around with the design options available for your particular template.
And there you have it! Blogging in Squarespace really is so easy, and once you get these basics down, there are a ton of ways to progress and grow your blog via Squarespace.
You can also always look into using a template if all of this seems a bit too overwhelming. All of our premium Squarespace templates come with blogs built in and make the process of starting your own content journey THAT much more simple. Check out our premium Squarespace templates below!
Want more blogging tips? Check out these posts 👇
4 techniques for higher converting blog posts
6 blog design tips for Squarespace
How to add a blog sidebar to your Squarespace site (7.1 and 7.0)
How to add related posts to your blog posts in Squarespace
How to automatically post your Squarespace blogs to social media
7 blog post ideas for designers that will attract more clients
