

How to add a Shop to Squarespace - Step by Step Walkthrough (7.1 and 7.0)
Are you on a mission to sell?
Whether you’re already a full-time business owner or even just someone who has thought of starting up your own side hustle, you probably know that selling your goods and services online via an ecommerce platform is the way to go these days.
Hosting your shop online allows super easy and convenient access to your offerings which helps drive sales and makes you more money. Who wouldn’t want that??
So, how exactly do you set up an online store that’s fully integrated within your website? In this post, we’ll walk you through the set up and design basics to get your Squarespace shop up and running in no time.
Let’s dive in!

How to Set Up A Shop In Squarespace 7.0 and 7.1
Setting up your shop can be quite daunting at first, as there are many individual settings and aspects to consider. Luckily, Squarespace makes the process pretty simple! First, we’ll discuss the general set up of your shop in both Squarespace version 7.0 and 7.1 since they’re very similar.
You can add a shop in any Squarespace site (7.0 or 7.1) and the backend resources are going to be almost exactly the same.
The biggest differences, functionally, between 7.0 and 7.1 when it comes to Commerce is that:
Squarespace 7.0 has a total site-wide product limit of 10,000, however, you can only add up to 200 products per store page. Squarespace 7.1, on the other hand, has a total product limit of 10,000 both site-wide and per page so you could, technically, put all 10,000 products on one single store page if you wanted to.
Squarespace 7.1 allows you to add subcategories to further organize your products.
In Squarespace 7.1 you have access to sell more types of products including blog content, video content and courses.
So if you're starting your shop from scratch and you have a choice between Squarespace 7.0 and 7.1, we recommend 7.1 because of the extra commerce features. It's also the newer version of Squarespace and generally has more features and updates than the older 7.0.
Adding your Shop in Squarespace 7.0 and 7.1
Okay, so how then do you actually add a shop to your Squarespace website? Let’s walk through the steps for both 7.0 and 7.1 now!
1. In your main menu under the Website tab, click on Pages
2. Click the “+” icon next to either your Main Navigation or Not Linked section and choose Store in the pop-up menu
Note: Adding your shop to the “Not Linked” section of your pages panel will hide it from your main website navigation. You will then need to link it elsewhere on your site via a button or text link in order for people to find it.

Squarespace 7.0

Squarespace 7.1
In version 7.0, you will then be able to rename your store to whatever you’d like and hit “Enter” on your keyboard to open up your main store panel.
In version 7.1, you will be prompted to choose whether to add a new category or a new store.

You’ll want to choose “Create a new store” here. You’ll then be able to choose a layout for your store (don’t worry, this can be customized later on) and rename it to whatever you’d like. Hit “Enter” on your keyboard after renaming to open up your store panel.
The "Create a new category" option will allow you to add a new category to an already existing shop (eg. Tops, Digital Workbooks, Candles, etc). If you click on this option, you'll be asked to choose which store you'd like to add the category to and then be taken directly into the main settings to add your category.
Edit the main Shop Settings
At the top right of your main store panel (or to the right of your shop name in the pages panel), click on the cog icon.

A store settings window will pop up that should look something like this:

In the General tab, you should edit:
Page Title: Make sure this matches the new name of your shop.
Navigation Title: This is the title that will show up in your main navigation. It can be the same as your Page Title or different, either way it should be simple and clear.
URL Slug: This is generally the same as the Page Title. Again, keep it simple and clear.
In version 7.1 you’ll also have the ability to edit the “Top Category Name” which will be the parent category for all items in your store, as well as choose whether or not to make this category visible in your store filters.
In version 7.0, you’ll also have the option to add a Page Description. Some 7.0 templates may show this description on your store page, so keep that in mind when choosing whether or not to add one.
Categories tab (7.1 only):
You can create and manage in bulk all of your shop categories here, however, if you’d like to add categories per product, you can do so on the individual product page.

In the SEO tab, you should edit:
SEO Title: This should be the same as your Page Title. If you leave this blank, Squarespace will usually pull in whatever name you have given to the page, but it’s always good to check.
SEO Description: Add a short description that will make people want to click on your store. This is shown on search engines underneath your SEO Title.

In the Advanced tab, you can edit:
Quick View: This is optional and will create a pop-up when the mouse hovers over a product showing a brief description.
Manage Categories (7.0 only): This is where you can manage your categories in bulk if you have any.
Manage Tags: This is where you can manage your tags in bulk if you have any.

How to Add Products to YOUR SHOP
To add a new product to your shop, click on the “+” icon at the top right of your main store panel.

You will then be prompted to choose a product type.
In version 7.1, the main product types to choose from are:
Physical: A tangible product that can be shipped or picked up
Service: A meeting or experience that doesn’t require booking
Download: A digital download that customers can download like a workbook, template, audio file, etc.
Gift Card: Customers can use this to purchase anything in your store
You also have the ability to sell some additional things via your website including:
Member Site: Access to a unique members-only area of your site
Video on Demand: Create and sell access to a library of video content
Acuity Scheduling: Sell scheduled services, classes, appointments, etc.
Course: Access to a series of curated lessons that teach a specific topic
Blog: Monetize your blog by putting it behind a paywall. This means that if someone new comes across your blog, they’ll first be met with information on how to pay and sign up before being able to access the content
These options are not exactly "products" that will be included as part of your shop, but rather individual features that can be created and sold on their own. You'll want to check out the linked resources for each feature for more specific set up information.

In version 7.0, the main product types to choose from are:
Physical: A tangible product that can be shipped or picked up
Service: A meeting or experience that doesn’t require booking
Download: A digital download that customers can download like a workbook, template, audio file, etc.
Gift Card: Customers can use this to purchase anything in your store
You also have the ability to create and sell the following features via your website:
Member Site: Access to a unique members-only area of your site
Acuity Scheduling: Sell scheduled services, classes, appointments, etc.

Once you’ve chosen your product type, you’ll want to fill out all of the most important information for that product! Each type might come with different set up requirements and options, but generally, you can count on adding:
1. A Product Name
2. A Product Description
3. Images for your product - you can add as many as you’d like

4. A Price for your product (you can also choose to put the product on sale)
5. If you’re selling a digital product, upload the file OR, if you’re selling a physical product, add your inventory numbers and fulfillment details
6. For physical products or services, you can also choose to add different variants with different prices and stock details (eg. a shirt that comes in multiple colors or an event that has a general admission and VIP level)


There are also a number of optional features that can be customized regardless of product type!
Organization:
Add specific categories for a product. Once added, categories will display on the product page and customers will also be able to filter through them on the main store page (if enabled). In version 7.1, you can also add subcategories to further organize your products.
Another way to organize your products is by adding tags. You can tag products with certain descriptors and then use these to filter in Summary Blocks around your site which can be super helpful for highlighting select products. Categories, however, are more beneficial for organizing products in your actual store.

Selling Tools:
Product Add-ons (7.1 only): Upsell customers by creating bundles or adding on smaller products to bulk up the deal.
Featured Product: Toggle this on to make a product featured. Featured products can be displayed in Summary Blocks.
Related Products: Use this to showcase similar items on a product page.
Product Reviews: Use this to showcase customer reviews directly on all product pages.

Marketing:
SEO and URL: Click “Edit” to customize the product SEO and URL settings.
Social Share: Click “Edit” to add a unique social image.
Social Accounts: You can choose to automatically update select social accounts when you publish a new product.

Checkout:
Subscriptions: Offer customers the option between making a recurring or one-time purchase, or make a product subscription based only.
Custom Forms: Create a custom form to collect unique information from customers when they add the product to their cart.
Custom Button: Enable the custom button to customize the Add to Cart button text.

Once you are finished customizing all of your product details, you can save the product and keep it unpublished, publish it immediately, or choose to schedule it for another time.

You can also duplicate a product if you have another one that’s identical in specifics by clicking on the double square icon in the top right corner, or completely delete a product by clicking on the red trash can icon.

Setting up your Squarespace Commerce Settings
Now it’s time to set up and finalize all of the nitty-gritty selling details like Payment Processors, Customer Notifications, and more!
Thankfully, Squarespace makes doing all of this really straightforward and easy. To get started, head back to your main menu and click on Selling.
Under the Selling tab, you’ll find some additional selling categories.

Products
This is where you can view and manage all of your products at once. You can filter through product type at the top and also add a new product straight from this window.
Orders
This is where you can view and manage all of your orders as soon as they start rolling in.
Discounts
Here you can create special discounts for your customers to use at checkout, which is a super cool feature! You can create an automatic discount that will show up for anyone who makes a purchase, or choose to create a unique discount code to create excitement and demand around a specific sale or promotion.
You can pick from a percent off, a specific dollar amount off, or even free shipping as a discount and can also filter which products the discount applies to.
Selling Tools

Under Selling Tools, you will find a ton of helpful resources and tools to help you sell. Here are some of the ones that we think are most important:
Point of Sale: If you sell in-person, we highly recommend getting set up with Point of Sale so that you can manage all of your orders, on and offline.
Product Status: Easily customize the settings for when your product is out of stock or at limited availability.
Waitlists: Set up waitlists to gather customer information while they wait for your products to restock.
Accounting: Here you can download sales data which is super helpful.
Customer Notifications: You should 100% set up your customer notifications! The settings are super easy to edit and really important. These are the emails that customers will receive if they abandon cart, purchase a product or interact with your shop in any other way. You can edit the Global Email Styes to match your branding and create a consistent look across all notifications by clicking “Edit Email”. You’ll then see a front-facing editor where you can make changes to any of the elements. Next, you can navigate through the different types of notifications in the left hand side bar and change the wording and configuration of each email as necessary by, again, clicking "Edit Email".


The remainder of your commerce settings can be found in your main Settings panel. To view them, you can click “Go to Settings” at the very bottom of the Selling Tools tab OR, click the Settings cog icon at the very bottom right of your main menu and then click on the “Selling” tab.
The main settings you’ll want to focus on here are:
Payments
This is where you can add your main payment processor in order to actually receive payments from sales. Customers will not be able to checkout until a payment processor has been added!
Squarespace gives you the option to connect Stripe or PayPal. You can also set up Square if you are in the US and have customers paying in person. We highly recommend setting up and connecting both Stripe and PayPal as it gives your customers multiple options for payment.

You can go ahead and click on “Connect” to sign into your account and connect, or sign up for an account from scratch if you haven’t already.
You can also set your store currency at the very bottom of this panel.
Customer Accounts
Turning this setting on allows customers to set up an account with a unique login. This can be really useful for returning clients or those who need to access their order information.

Cart
Under Cart you can customize the “Continue Shopping” link and also choose whether or not to enable Express Checkout which allows customers to bypass their cart and go directly to checkout.
Checkout
You have the ability here to change many of your checkout settings. You can:
Enable abandoned checkout recovery emails that remind customers about their cart
Enable email sign ups and connect your mailing list (only works w/ Mailchimp or Squarespace email campaigns)
Set default settings for shipping and billing addresses
Customize the look of your checkout page
Set a minimum order amount
Add your store policies
And so much more!
Taxes
Enter in all of your tax information here. This, of course, is going to depend on where you’re selling from and who you are selling to. Make sure to look up your own tax information prior to selling!
Shipping
Shipping is personal depending on the size and type of business you run. If you’re a smaller shop you might ship manually, whereas bigger shops might have a contract with a shipping company.
Under Shipping Options, you can choose to add a flat shipping rate, a rate depending on weight, or a carrier calculate rate for FedEx, UPS, or USPS. You also have the option to import shipping details from your Etsy account. Choose what’s most appropriate for you!

You can also set up pickup options and local delivery options here.
Okay, now that we’ve discussed all of the boring set up, let’s get into the fun stuff, aka, design!
Designing your shop in Squarespace 7.1
The great thing about the shop page in version 7.1 is that it is completely customizable, just like any regular page on your website! This gives you more options than in Squarespace 7.0, which is a huge plus.
In 7.1, the “shop” shows up as a section on the page. This means that you can add additional sections above and below the shop section to fill out the page however you’d like. If you are familiar with designing pages in Squarespace 7.1, then you will be able to customize your shop page with no problem.
Customize the shop section
To edit the actual shop section of your shop page
Click on Edit in the top left corner
Scroll down to where you see either the test products or the products that you’ve added
Hover over that section and click on Edit Section

Under the Format tab of the settings panel, you can customize things like:
Width
Column and Row spacing
Aspect Ratio of the images
Text Alignment
Whether or not to show Price
Category details and appearance
Under the Color tab of the settings panel, you can edit the colors by choosing from one of your existing color themes. Keep in mind, however, that this will change the color theme of all of your individual product pages as well!
If you would like to customize the colors of this shop section even further, you can do so in your Site Styles.
Click on the Paintbrush icon in the top right corner of your screen
Click on the Colors tab
Choose the color theme that you are currently using and scroll down until you find the Products: Basic Grid section

Here you can further customize the colors for the product titles, price, category navigation and more.
If you would like to customize the fonts of this shop section even further, you can also do so in your Site Styles.
Click on the Paintbrush icon in the top right corner of your screen
Click on the Fonts tab
Click into Assign Styles at the very bottom of the fonts menu
Find the section called Products: List
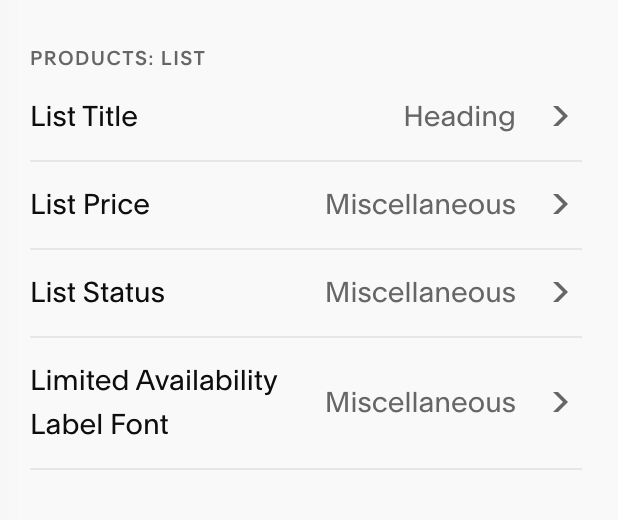
Here you can further customize the fonts for the product titles, price and more.
Customize the individual product pages
To get into design changes for each individual product page, click on any product in your main store panel and then hover over Edit in the top left corner.
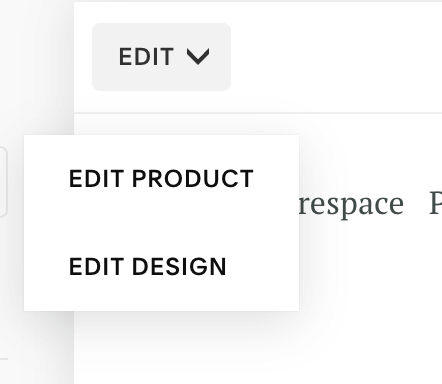
Click on Edit Design and that will take you into editing mode for the product page (Edit Product will allow you to make changes to the product details).
Once you’re in editing mode, hover over the page and click on Edit Section in the top right.

In the settings panel under Format, you’ll be able to customize things like:
Layout: Choose from Simple, Wrap, Full and Half. Keep in mind that you’ll only be able to further customize settings while using Simple layout. The other three don’t allow you to make any additional changes!
Width
Image Display and Placement
Text and Content Alignment
Button Width
And so much more.
Under the Color tab, you can edit the colors by choosing from one of your existing color themes.
If you would like to customize the colors of your product pages even further, you can do so in your Site Styles.
Click on the Paintbrush icon in the top right corner of your screen
Click on the Colors tab
Choose the color theme that you are currently using and scroll down until you find the Products Detail Page section
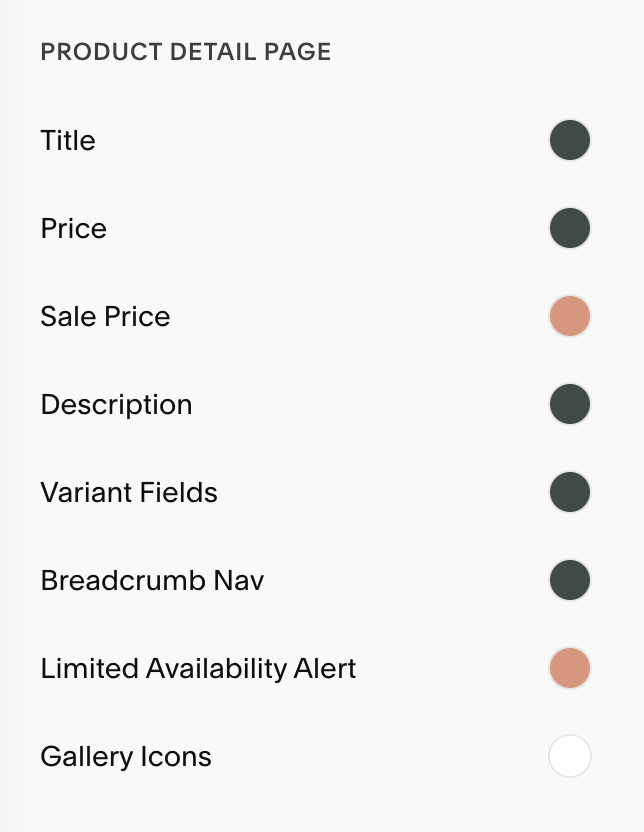
Here you can further customize the colors for the product title, price, description and more.
If you would like to customize the fonts of your product pages even further, you can also do so in your Site Styles.
Click on the Paintbrush icon in the top right corner of your screen
Click on the Fonts tab
Click into Assign Styles at the very bottom of the fonts menu
Find the section called Products Detail Page

Here you can further customize the fonts for the product title, price, description and more.
Caution: When you make changes to an individual product page, the changes will populate in ALL product pages, not just the one you are currently viewing! Just be aware that design, color and font changes will be constant throughout all products on your website.
Add a shopping cart icon to your site header
In Squarespace 7.1, the shopping cart icon doesn’t automatically show up in your site header. However, this is a really useful feature and can improve sales within your site!
To display the cart in your header
Click on Edit
Hover over the top of your site and click on Edit Site Header
Click on Add Elements on the bottom left
Toggle the cart option ON

Designing your shop in Squarespace 7.0
The design of your Squarespace 7.0 shop page does heavily depend on the template you’re using, but regardless, the design capabilities still tend to be very limited in this version.
Unlike version 7.1, you cannot add additional sections to the shop page as your products make up the entire page in 7.0 vs just one section. Your template may allow you to add an Intro, which you can do by hovering in the area above your products and clicking Edit next to where it says “Intro”.

The other design customization Squarespace allows is to add a background image to your header/Intro area, which is pretty cool! You can do this by clicking on the settings cog icon in your main store panel and then choosing the Media tab. Here you’ll be able to upload any image you’d like. Again, this is only possible on some 7.0 templates, not all.

Additional customizations for the shop page
To find out what other customizations your template allows for the shop page, you’ll want to navigate to your Site Styles.
Make sure that you are viewing your shop page
In your main menu under Website, click on Design
Click on Site Styles and scroll to the very bottom to find the Product sections

Reminder: We are using the Brine template. Your Site Styles might look different depending on which 7.0 template you’re using.
Here you might have the option to change things like items per row, alignment, spacing, title appearance, price appearance and more.
Customize the individual product pages
To make customizations to the individual product pages:
Make sure that you are viewing a product in your shop
In your main menu under Website, click on Design
Click on Site Styles and scroll to the bottom to find the Product sections

Reminder: We are using the Brine template. Your Site Styles might look different depending on which 7.0 template you’re using.
Here you might have the option to change things like fonts, colors, the product gallery, breadcrumbs, alignment, spacing, and more.
Caution: When you make changes to an individual product page, the changes will populate in ALL product pages, not just the one you are currently viewing! Just be aware that changes will be constant throughout all products on your website.
Add a shopping cart icon to your site header
To display the shopping cart icon in your header, if it isn’t already:
In your main menu under Website, click on Design
Click on Site Styles
Scroll down to the Header: Layout section
Under “Cart Position” change it from Hide to wherever you’d like it to display

Adding Product Blocks to your Website
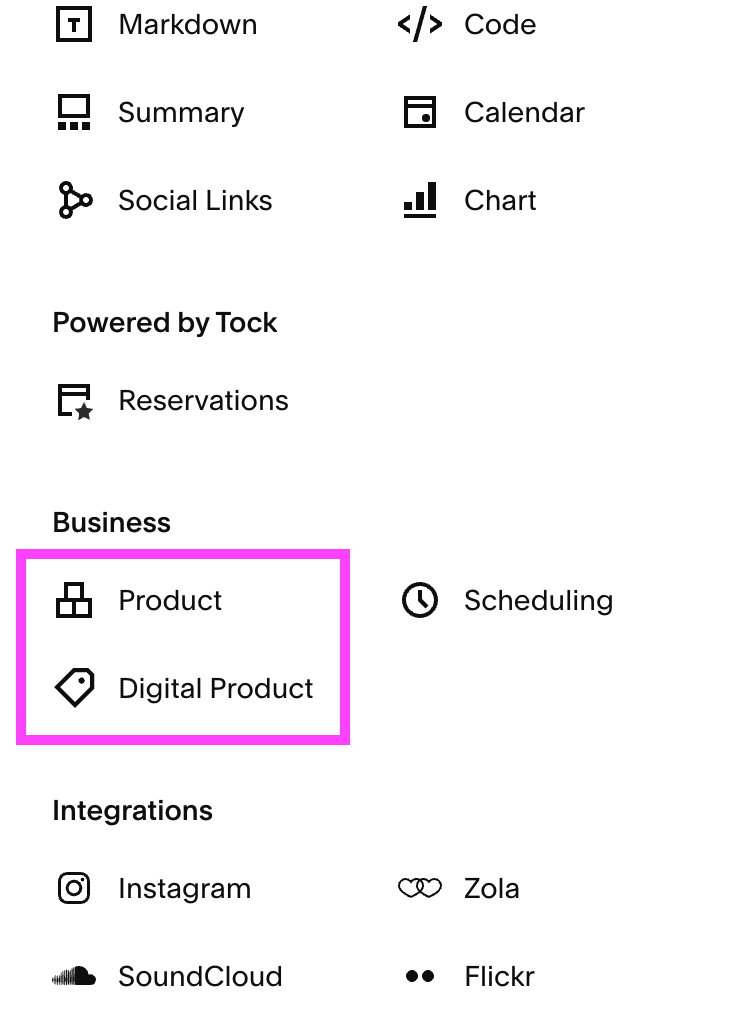
Another shop related customization you can make to your website is adding product blocks to any page. You can add a product block to highlight individual services, downloads or physical products.
You also have the option to add a digital product block to highlight paywalled member sites, blogs, courses or other memberships sold on your website that are separate from your main shop. For more information on adding digital product blocks check out this article.
In order to add a product block to your site you need to have an active store with at least one published product, so this is usually the last step you'll take once your shop is all set and ready to go live. You can also continue to utilize this block feature to highlight and promote your newest or most popular items/offerings!
You can add a product block just like you'd add any other block.
In Squarespace 7.0:
Navigate to the section where you'd like to add the block
Click Edit
Click the blue "+" icon wherever you'd like to add the block
Choose "Product" in the pop-up list of blocks
In Squarespace 7.1:
Navigate to the page you'd like to edit and click "Edit" in the top left corner of your screen
Hover over the section you'd like to edit and click "Add Block" in the top left corner
Choose "Product" in the pop-up list of blocks
Customizing product blocks
To access the settings for a product block (in both 7.0 and 7.1), click on the block and then click the Pencil icon.
Under the Content tab, you can search for the specific product you want to display and choose it to add the product and it's information to the block.

Under the Design tab, you can customize the alignment of the block as well as toggle on and off some different elements like image, title, price, and more.

Once your product block is added, customers will be able to click directly on it to view more and purchase! These blocks are perfect to add to your homepage or a sales page to create interest and make purchasing a product super convenient.
And that’s it!
We hope this guide helped you to more easily set up and design your shop page. If you’re new to setting up a website, and aren’t sure which version to start with - we would recommend using Squarespace 7.1 in order to access some more advanced design and customization features as well as some additional functionality features like the higher product per page limit, a wider range of product types and subcategories.
Overall, however, both versions of Squarespace are pretty equal when it comes to shop settings and you can’t really go wrong! If you’d like more information, Squarespace has a whole series on getting set up with Commerce that you can check out here.
Want more Squarespace tutorials? Check out these posts 👇
How to integrate social media with your Squarespace site
Squarespace SEO: Boosting your site's visibility with our go-to SEO checklist
How to add a privacy policy and terms & conditions to your Squarespace site
How to start a blog with Squarespace
How to create a sales page in Squarespace
If you liked this post, Pin it to Pinterest! 👇🏻
