

A Beginner's Guide to Squarespace - Step by Step Tutorial 2024
By now, you probably know we're huge fans of Squarespace, and for good reason! As a highly versatile, easy-to-use, and all-in-one website building platform, Squarespace is our go-to recommendation for anyone wanting to build a beautiful, professional website, beginner or pro!
Squarespace has been making waves in the DIY website builder world in recent years, with a vibrant community of users at the ready to help each other out, a huge variety of free and premium templates to help you on your way, and a beginner-friendly, drag-and-drop interface that requires zero code.
It comes with all the features you could ever need all in one place, from e-commerce, blogging, and portfolios, to courses, email marketing, and project management, making it extra convenient. It's also secure, meaning that you don't have to purchase or configure your own website hosting, and comes with free support if you get stuck.
Of course, Squarespace isn't the perfect solution for everyone so to see how it compares to other website builders out there check out this post, but overall it's an amazing platform for small business owners, service-based businesses, and creative professionals who are looking for an easy to maintain, professional website that doesn't require any crazy coding or a huge investment.
To help you decide if Squarespace is right for you, or if you're ready to dive right into building your own site, this week, we're teaching you the Squarespace basics to show you just how easy it is to use and how you can create your dream site!
Let's dive in!
Start a free trial website
Let's start right from the beginning! Head to Squarespace.com, click on Get Started in the top right hand corner.

You'll then be prompted to pick one of Squarespace's free website templates as a starting point.
Choose a topic or click on I'm Just Browsing in the top right corner to see all of the template options available.


Use the left hand sidebar to filter per type or industry, and click on any website template to preview it.
Here, you'll be able to scroll through the template home page, preview what it looks like in different color presets, or click on View Demo Site to see what else is included in the design.

Once you've found a design that hits the spot, click on the Start With This Design button and Squarespace will take you straight to your trial site and prompt you to create your login (if you don't have one yet!).
How to choose the right template to start with
Every Squarespace 7.1 website has the exact same functionality so choosing a template to start with is purely aesthetic and is there to save you time picking the look for your website and building out your pages. Every template is totally customizable and has access to all the same built-in editing features, so ultimately you can change it up completely if you like!
The trick when choosing a template is to think about:
Which template would work best for your content?
Which template would you have to do the least amount of work to?
Which template do you just prefer visually?
Note! Once you pick a template for your website you won't be able to simply apply a new one but you will be able to tweak the styles and design of your existing website to match the styles of any other template you like. If you wanted to use another pre-designed template, you would have to start from scratch on a new Squarespace website and would have to manually move your content (images, text, etc) over to the new template site.
👉 How to Pick the Best Squarespace Template for your Business
Premium Squarespace Templates
If Squarespace's built-in templates just aren't doing it for you, starting with a premium Squarespace template, professionally built by a third-party website designer is an amazing option too!
There are tons of Squarespace template shops out there these days (including ours!), with custom built templates for every possible industry and style. These templates typically come with their own tutorials and resources, total customization freedom, and a unique design that's as close to custom as you can get for a fraction of the price.
Check out some of our premium Squarespace templates below 👇


👉 Squarespace Templates vs. custom website design
Blank site
If you prefer to start from scratch, you will still have to start with one of Squarespace's free templates to begin with. From there you can delete all of the demo pages in the template and customize it to make it your own!

Squarespace Free Trial
Any new website that you start on Squarespace will come with a 14-day free trial that allows you to test things out and play around without having to pay!
You can also create as many free trial sites as you like, so if you aren't loving a design and want to try out another one or experiment with something new, you can! Every new site that you start will have its own unique trial.
Once you're ready to publish your site or when the free trial expires (whichever comes first), you will need to purchase a Squarespace subscription to set your site live and keep it active. If you don't upgrade to a paid plan, any content or design changes made during the trial will be marked for deletion - and you don't want that!
Navigating the Squarespace Account Dashboard
When you first log into your Squarespace Account Dashboard, it will look something like this (minus all the websites!):

You'll be able to toggle between your websites and any Squarespace domains you purchased by switching between Dashboard and Domains at the top.

Below that, you'll see a list of all of the websites associated with your Squarespace account, whether that be any websites that you started yourself or websites that you have been added to as a contributor. Click on any website in the list to access the editor.
You'll also be able to see additional information about the website, such as when the trial expires or subscription renews, any tags that you've added (this is really handy to keep websites organised if you have lots in your dashboard!), and any domains connected.

If you click on the three dots next to your website, the following dropdown will appear, from where you'll be able to access additional settings, duplicate your site to create a backup copy, and pin it to the top of your dashboard if you like!

Your Squarespace Website Sidebar
Your website's sidebar is your main control panel to access all of the various settings for your site! There are a ton here so let's walkthrough some of the main ones!

Website
Pages: Here, you will be able to navigate, add, remove, and reorder all of your website's pages.
Styles: This is where you can access and edit your website styles, aka your fonts, colors, buttons, forms, etc. These can also be accessed via the paintbrush icon in the top right corner of your site as a shortcut!
Assets: This takes you to your Asset Library where all of the images that you upload to your site are stored. You will be able to add images in bulk here, as well as rename images, and keep them organized in folders.
Selling
This contains settings and data related to your Squarespace Shop (if you decide to set one up!). Including orders, inventory, discounts and other selling tools.
Invoicing
You will be able to invoice customers directly from your Squarespace website, as well as send proposals, contracts, estimates, and access other project management tools.
Content & Memberships
Here, you will be able to manage any Courses, Member Sites, or monetized blog content that you set up. Including tracking revenue, managing pricing plans, and payments.
Donations
This is where you can set up donations for your site.
Scheduling
This takes you to Acuity to manage your calendar, clients, and appointments.
Marketing
Here, you will find settings for Email Campaigns, promo pop ups, and announcement bars.
Contacts
This section will contain information about any leads that come through your site, whether it be subscribers via your Squarespace mailing list, leads via newsletter blocks on your site, or customers via Squarespace eCommerce.
Analytics
Just like it sounds! This will contain data about your website, including sales, engagement, and traffic.
Settings
You can access your website's settings by clicking on the cog icon at the bottom of the sidebar.
This will open a whole new sidebar where you will be able to update your site's availability (private, password protected, or public), your business information and languages, any extensions, permissions, domains, billing details, and social links, among other things.
We recommend going through all of these settings and adding in as much info as you can about your business as one of the first set up steps!

Tip! Squarespace does often make changes to where various settings are located. If at anytime you're not sure where to find a particular setting, hit the '/' key on your keyboard to pull up a search tool!

Help
This is where you will find helpful links to Squarespace's help centre and tutorial library.
You can access this by clicking on the question mark icon at the bottom of the sidebar.

Your Squarespace Pages Panel
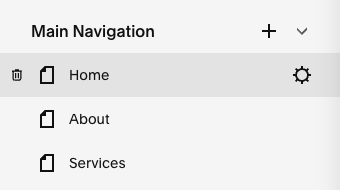
Navigate to your Pages panel by going to Website > Pages in the sidebar. Here, you will see a list of all of your website pages divided into two sections:

Main Navigation:
Any pages in this section will appear in your website's header navigation.

Not Linked:
This section will contain all the other website pages that you don't want to link to in your navigation.
You can freely drag and drop pages to reorder them and move them between the Main Navigation and Not Linked sections.
Adding pages
You can add pages to either section by clicking the + icon next to the section name. In the pop up, select what type of pages you would like to add. There are a ton to choose from, from a regular blank page to a templated layout, blog, store, portfolio, course, etc.

Page settings
Each page will have its own settings which you can access by clicking the cog icon next to the page name.
This will open a pop up which contains the following settings:

General: Here you can add and modify your page title and URL slug, enable or disable the page, set a password protection, duplicate your page, or set it as your home page.
Navigation: Choose whether to show the header and/or footer on that particular page.
SEO: Here you will be able to add extra SEO information, like a meta description and SEO title.
Social image: You can add a custom social image that will display if your page is shared anywhere online.
Advanced: You can add custom header code injections if you wish.
Note! Some pages will have slightly different settings. For example, your Blog page settings will also have a slider for how many blog posts you want to display per page, and a place to manage your Blog tags and categories.
Utilities
At the very bottom of your Pages panel, you will see some additional settings, including:

System Pages: This is where you can manage and customize your 404 page, checkout page, and lock screen.
Website Tools: Here you can add custom CSS and code injections, as well as activate an announcement bar, promotional pop-up, and mobile info bar.
Trash: Any page that you delete will be stored here for 30 days. You can choose to permanently delete a page right away or restore it before the 30 days is up.
You will also see which version of Squarespace your site is built on.
Editing Your Page Design in Squarespace
Page sections
Every Squarespace 7.1 page is made up of different sections. These essential building blocks are typically stacked on top of one another to create a full page.
Adding a new section
To add a new section, click Edit in the top left corner to enter editing mode then click the blue Add Section button.

If this is a blank page, the button will appear in the middle of the page.

If there already are other sections on the page, the button will appear between other sections, wherever you would like to add the new section.
In the pop up, you will be able to select a blank section, or a pre-designed section created by Squarespace.

Section settings
Once you've added a section, hover over it to reveal additional settings in the top right:

View Layouts: This is a new Squarespace feature which allows you to reshuffle the layout of your section automatically.
Edit Section: This opens an additional menu, with settings to adjust the grid spacing of the section, the number of rows, the height, alignment, whether you would like to add a divider, a background image, and select a color theme!
📑 Duplicate Section: This lets you duplicate any section and is very handy to use as a backup while you are working on your site.
❤️ Save Section: We love this one! Save a section to use on any other pages on your site or to use again later. To access the sections you have saved, click Add Section and go to the Saved Sections tab in the left hand side of the pop up.
⬆️ ⬇️ Reorder Section: Use the arrows to move your sections up or down, above or below the sections around it.
🗑️ Remove Section: This will permanently delete the section. Note that deleted section cannot be restored so make sure to save it before you delete if you think you might want to use it again later.
The Fluid Engine grid
Squarespace Fluid Engine (the very latest version if you are not yet familiar), uses a grid system along which you can position blocks (like text blocks, image blocks, or button blocks) to create different layouts in each section of your site. This grid makes it easy to create interesting layouts all whilst retaining even spacing, a godsend for website beginners!
To view the grid on any section around your site, press the 'G' key on your keyboard.

As you drag blocks around the section, they will automatically snap to different positions along the grid, making for an ultra flexible editor, and easy customization!
By default, the grid spacing will be set to an 11 x 11 gap, however you can customize this freely for each section on your site by clicking Edit Section and customizing the grid settings in the Content tab.

Rows: Customize how many grid rows you would like your section to have. More rows = a longer section.
Tip! You can also use this button at the bottom of the section to drag up or down and adjust the number of rows as you're editing.

Gap: This refers to the gap between each unit in the grid. You can choose to have no gap, the standard 11 x 11 gap, or click the three dots to set a custom horizontal and/or vertical spacing.

Fill Screen: If toggled ON, you will be able to set a preset padding around your section by adjusting the height, as well as alignment. If toggled OFF, the grid will take up the entire section from top to bottom, which can be useful for creating overlapping section effects for example.

Fill screen toggled ON

Fill screen toggled OFF
Blocks
Each section on your site is made up of various content blocks, such as images, text, or buttons.
Each block can be individually dragged and positioned anywhere on the grid and has its own set of settings to help you customize it. You can access these settings by double clicking on the block.
To add a block to a section on your site, hover over the section and click the +Add Block button in the top left corner. In the pop up, select which type of block you would like to add.


Mobile editor
One of our favourite things about the new Squarespace Fluid Engine editor is that you can customize the mobile version of your site almost entirely independently!
To preview what the mobile version of your site looks like, click the mobile icon in the top right corner.

Click Edit in the top left, and here you'll be able to re-arrange your blocks any way you like around the section without it affecting the desktop version of your site!
Note! Not everything is independent, you won't be able to delete blocks entirely or reorder sections for example.
👉 How to customize your mobile design in Squarespace 7.1 with the new Fluid Engine Editor
👉 Hacks to make mobile editing in Squarespace Fluid Engine faster
Editing your Site Styles
Your site styles refer to the look of your website, aka the fonts and colors used!
You can customize these at anytime by clicking the paintbrush icon in the top right corner of your site, or by heading to Website > Site Styles in the sidebar. Here, you will see a menu open on the right hand side of your website.

Note! Your site styles are site-wide! Meaning that if you customize a particular setting, it will apply everywhere on your site that this particular setting or element is used.
Site Styles Themes
This new Squarespace feature, allows you to choose from a variety of preset combinations of fonts and colors ('themes') according to various moods. You'll be able to choose from professional, playful, sophisticated, friendly, bold, or quirky themes for your website to give it a distinct vibe in literally one click.


This option is great if you haven't decided on brand fonts or colors just yet and want to explore some options. Of course, nothing is set in stone and you'll be able to customize these themes, or the styles included in your template freely!
How to customize your fonts in Squarespace
To customize your website fonts, head to Site Styles > Fonts.


Font Packs: Squarespace has dozens of pre-designed font packs with professionally picked out font pairings. Choose between sans-serif, serif, or mixed and click on any pack to see what the fonts look like on your site in real time!

Headings, Paragraphs, and Button fonts: Back in the Fonts panel, you'll be able to further customize your website fonts within the Headings, Paragraphs and Buttons tabs. You'll be able to assign a new font entirely, choosing from Squarespace's huge built-in font library, as well as customize the font size, weight, line height, and letter spacing.


Assign Styles: Under this tab, you will be able to select additional fonts for various elements around your site, including your site title, navigation links, announcement bar, blog and portfolio elements, etc.

How to customize your color palette in Squarespace
To customize your website colors, head to Site Styles > Colors.


Main Color Palette: Click Edit Palette just below your main color palette swatch. Here, you'll be able to select custom colors for each color swatch, or scroll down to choose from one of Squarespace's presets.


Section Color Themes: Back in the Colors panel, you will see a series of ten color themes ranging from Lightest 1 to Darkest 2. These are automatically generated by Squarespace based on the colors in your main color palette though are totally customizable! Click into any of the themes and then click on the color swatch next to any of the element names to customize. You'll be able to select a color from your color palette or a completely custom color.

Adding Features to your Squarespace Website
Blog
To add a blog to your Squarespace site, go to Website > Pages and click the + icon to add a new page to your Main Navigation or Not Linked pages section. Select a Blog page type.

You will then be prompted to choose a blog layout (don't worry you can customize it later!) and give your blog a name.
You'll then be taken to the blog overview page which is essentially a "homepage" for your blog. On this page, you'll find a summary of all of your blog posts. The rest of the page can be customized just like any other page on your website!

To add a new blog post, go to Blog Content in the sidebar and click the + button. A new post will automatically open up in editing mode!
👉 How to Start a Blog with Squarespace in 2024
Shop
To add a shop to your Squarespace site, go to Website > Pages, click the + icon to add a new page, and select Store in the pop-up.
Select Create New Store, choose a layout, and give your store a name.
Click Edit to customize your store "homepage" or + to add a new product.

You'll be able to choose from a wide range of product types, from physical products or digital downloads, to services, scheduling, courses, and more!

Note! You will need a Business plan or above to be able to access Squarespace's e-commerce features.
👉 How to add a shop to Squarespace - step by step walkthrough
Portfolio
Similar to a Blog but with features more specifically designed to showcase a wide variety of content and imagery, Squarespace's portfolio collection pages are ideal for projects, galleries, and case studies.
To add a portfolio, go to Website > Pages, click the + icon, and select Portfolio in the dropdown.
Choose a layout, name your portfolio, and customize just like any other page on your Squarespace site!

👉 The ultimate guide to Portfolio pages on Squarespace 7.1
Course
One of Squarespace's long awaited features, Courses allows you to host any type of course, and sell it directly from your Squarespace site.
There are a few ways to add a new course to your site, though the easiest is to go to Website > Pages, click + and select Course.
You'll again be prompted to select a layout and name your course.
You'll then be able to customize the Course Overview page as well as add individual lessons and modules under Course Content.

Once you've done so, click on Pricing Plans in the sidebar to set up how much your course will cost and whether it will be a fixed amount or subscription.

Next, create a sales page and start selling!
👉 How to Host a Course on Squarespace - New Squarespace Courses Feature
Launching your Squarespace website
Previewing and testing
Before setting your site live, it's important to make sure everything is looking exactly as you want it to and working correctly!
Make sure to preview your site by clicking on the arrow in the top right corner of your site, scroll through your entire site and double check that there are no broken links (an SEO killer!) and that all your buttons are working as they should.

You'll also want to make sure that the mobile version of your site looks just as good! Preview the mobile version of your site by clicking on the mobile icon in the top right corner, and again scroll through thoroughly to make sure you are happy with the design.
Connecting your domain and purchasing a plan
When you're ready to take your Squarespace site live, connecting your custom domain (aka URL) is a key step, giving your site a professional look and making it easy for visitors to find you with a recognizable name.
To connect a domain, go to your site's Settings (cog icon at the bottom of your sidebar) and select Domains & Email > Domains.

Here you'll be able to purchase a new domain directly through Squarespace Domains by clicking Get a Domain, or connect an existing one by clicking Use a Domain I Own.
👉 How to Connect a Domain to your Squarespace Website
Before you can go live, you'll also need to pick a subscription plan that fits your needs! Squarespace offers four different plans, all with different features, so choose one that aligns with your site's goals. We typically recommend the Business Plan, unless you're planning on selling a lot, in which case one of the higher Commerce plans may be better suited.

👉 Use our code BIGCATCREATIVE10 for 10% off your first year!
Publishing your site
Ready for the big launch? Go to Settings (cog icon in the left hand sidebar) > Website > Site Availability and change your site's status to Public.
Congrats! Your Squarespace site is now live and ready to be shared with the world! 🎉
Learn how to easily DIY your dream site
If you’re just starting out and feeling a little overwhelmed, you’re definitely not alone! Which is why we created a free training walking you through all the key steps you need to take to DIY your website seamlessly.
From figuring out who your ideal client is and how to wow them with a design that's right on-brand, to planning and writing effective website copy, this training will give you all the base skills you need to kickstart your website-building journey.
Ready to dive in? Sign up for the free training here!
And there you have it! Our beginner's guide to Squarespace! We hope this post was helpful to point you in the right direction and help you get started on your site! If you'd like more Squarespace tips and tutorials from us, make sure to check out our blog or Youtube channel (if you're more the visual type), we post new content every week and can't wait to see your big beautiful website dreams become reality ✨
Want more tips? Check out the posts below 👇
How Long Does It Take to Build a Website?
How much will building your website on Squarespace actually cost
8 pages you should have on your website as a small business owner
Squarespace SEO: Boosting your Site's Visibility with our go-to SEO Checklist
If you liked this post, Pin it to Pinterest! 👇🏻
