

How to Host a Course on Your Squarespace Website
Sharing your hard-earned knowledge with the world is an amazing way to build a community, position yourself as an expert in your field, and make passive income in the process.
Whether you’re a cooking connoisseur, tech wizard, or master of mindfulness, people are always eager to learn and have someone show them the way.
Indeed, the online course market reached a mind-boggling $166 billion USD in revenue in 2023 and this is only projected to grow in the years to come (statistica.com). So if you’ve got the knowledge, make sure to flaunt it and take a cut! 💸
Luckily, Squarespace makes it incredibly easy to put together and share your online course directly on your website with their newly released (and long awaited) Courses feature 😎
It’s easy to use, it means that you can keep everything under one roof, and is pretty cost and time effective given that you don’t need to learn or pay for a third-party platform.
In this post, we’ll walk you through all the steps you need to take to create a beautiful and engaging course on Squarespace that is sure to impress your students.
Let’s dive in! 👇
What is Squarespace Courses?
Courses is an amazing new tool which, you might have guessed it, allows you to design, build, and sell online courses directly on your Squarespace website.
You'll be able to upload video tutorials, audio recordings, images, text, and downloadable workbooks, and create individual modules and lessons which can be edited and customized just like any other page on your Squarespace website.
This means keeping all of your course content perfectly on-brand, and a seamless and professional experience for your site visitors.
You'll have the option to set your course pricing as a one-off payment, as multiple instalments, an on-going subscription, or even for free, with all of your precious content hidden behind a secure paywall that is seamlessly connected to a payment processor.
Don't worry, if all this is sounding like A LOT, just keep reading because we'll run you through everything you need to know step by step below!
Right now, Courses is only available for Squarespace 7.1 websites but if your website is built on the older Squarespace 7.0, you can easily make the move to the newer platform and take advantage of all of the new exciting features, including Courses!
How Much Does Building Your Course on Squarespace Cost?
Courses is available for all Squarespace 7.1 websites with a Business plan or above, meaning that at the very least, it will cost you $23 USD per month to host your course on Squarespace (along with your website, which is a pretty good deal if you ask us!).
This basic plan does only include 30 minutes of video storage and a 9% transaction fee for any sales that you make, so if your video tutorials are longer than 30 minutes all up or if you make a decent number of sales and would like to lower the transaction fee, you'll need to add a Digital Product Add-On subscription to your Squarespace site.

These add-on plans start at an extra $9 USD per month and give you 10+ hours of video storage and significantly lower transaction fees depending on the one you pick, making Courses a decently cheaper option than many other course hosting platforms out there like Kajabi (which starts at $149/mo) or Teachable (with a Pro plan at $119/mo) if your website is built on Squarespace already.
👉 Check all Squarespace subscriptions pricing and what's included here
So, Should you Host Your Course on Squarespace?
Depending on the complexity of your course, the features that you need, and whether your existing website is built on Squarespace or not, Squarespace Courses may not be the very best course platform for you.
To help you make your choice, here's a round up of the pros and cons of using Squarespace for your course!
Pros of Hosting Your Course on Squarespace
Everything under one roof
If your website is built on Squarespace already, one main advantage of using the Courses feature is that you'll be able to have everything for your business in the same place, making your business extra streamlined. This also means that you won't have to pay for expensive third party subscriptions to host your course somewhere else and that you'll be able to keep your visitors on your website rather than sending them to another platform which is better for traffic and conversions.
Same interface
If you already know how to use Squarespace, building your course in the same platform will save you a ton of time learning how to use a different platform. Course pages use the same Fluid Engine editor as all the other pages on your Squarespace site which means an easy to use, and highly customizable drag-and-drop editor to create any course page design you like!
On-brand
Building your course on your Squarespace website means that your course will take on the same site styles as the rest of your website. This means totally on-brand fonts, colors, and styles and a cohesive and professional look overall.
Build as many courses as you like
Regardless of the plan that you choose, there is no limit on how many courses you can build. That said, there is a limit of 250 lessons per course.
Cons of Hosting Your Course on Squarespace
Your website is not built on Squarespace
If your existing website is not already on Squarespace, then we would recommend exploring different Course platforms as the advantages of using Squarespace Courses are largely around having everything in the same place, and saving time and money as a result.
Some missing advanced features
Squarespace Courses does lack some more advanced features like community interaction areas, affiliate programs or advanced automations that some other platforms designed specifically for education might have. It also has a maximum of 250 lessons per course which may be limiting if you have a very complex course.
Can't import existing students
If you're thinking of making the switch from another platform, it's important to know that right now it's not possible to bulk import existing students. There are workarounds though, like sending your students a link to purchase the course and a 100% off discount code to get them signed up, but depending on how many students you have, this might mean quite a bit of extra admin work for you!
High transaction fees
With transaction fees starting at 9% if you don't upgrade to a Digital Product Add-on Subscription, Squarespace might be taking quite a chunk of your profits! While you can lower these fees by paying an additional monthly subscription, you will need to use a bit of maths to figure out if paying a monthly set fee or higher transaction fee will work out better for your wallet in the long run.
Convinced? Let us show you how to build your course 👇
How to Add Your Course on Squarespace
Step 1 - Add a Course Page
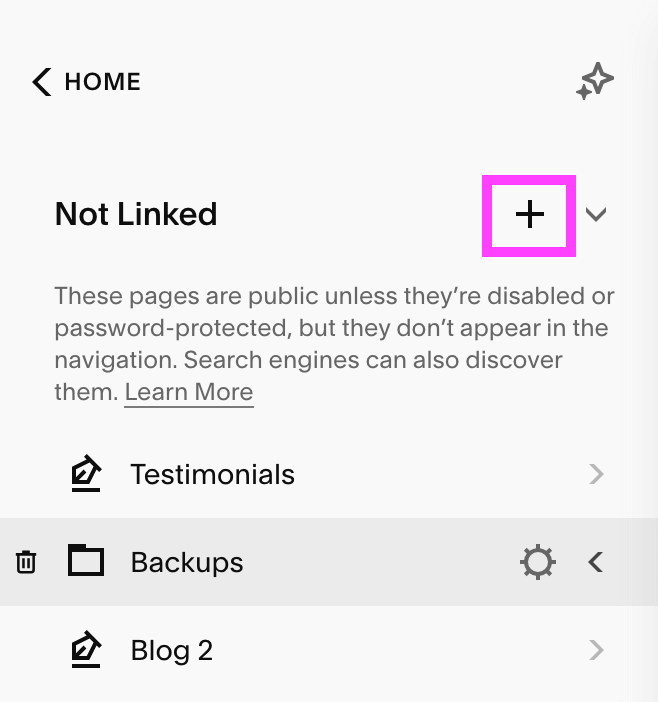
In your Squarespace website's main menu, go to Website and click the + icon to add a new page in your Not Linked Pages section.

In the pop-up menu, scroll down to Collections and select Course.

Next, select a template for your course overview (don’t worry, you can easily change this later!).

This will create a course page on your website which you’ll be able to rename to whatever you like!

Once you’ve done so, click into your course to start customising it!
Step 2 - Add Your Course Content
First, click into the Course Content tab to start adding in your lessons.

Demo content
Squarespace automatically includes demo content which you can use as a template, or simply delete if you prefer to start from scratch!

To delete lessons, click on the square icon to the left of the lesson name(s) and click Delete in the bottom corner.

To delete entire chapters (including the lessons within it), click the three dots to the left of the chapter name and select Delete from the drop down.

Adding Chapters
Chapters are the modules of your course. They are helpful to keep your lessons organized under specific topics or headings, and make it easier for your students to navigate through your course, though are totally optional!
To add a new chapter to your course, click the + icon at the top of the page and select Chapter.

Add a Chapter Title and click Save.

You'll see your new chapter in your course sidebar.

You can rename the chapter at anytime by hovering over it, clicking the three dots, and selecting Edit Chapter.

Adding Lessons
Lessons are the individual "pages" within your course and can include video tutorials, images, text, buttons, and pretty much any building blocks!
You can add up to 250 lessons per course (which is quite a lot!).
You can leave them as is in the sidebar if you don't have too many. Though if you have more than 10, we'd recommend organizing them within distinct chapters (as we mentioned above) by dragging and dropping them into a particular chapter "folder".
To add a new lesson, click the + icon at the top of the page and select Lesson.

This will bring up the lesson settings menu.

Start by filling in the Lesson Title, add a brief description of the lesson in the excerpt section, then edit the custom URL.

Upload a lesson thumbnail if you'd like by clicking the + icon. You'll be able to upload an image from your computer or select an image from your Asset Library.

Next, head to the Video tab in the left hand sidebar and click the + icon to Add a Video.

You'll be able to either upload a new video from your computer, choose one that you have already uploaded to your Asset Library, OR add a Youtube or Vimeo video from a link.

If you choose to upload your video directly to Squarespace, it is important to note that you will only have 30 minutes of video storage by default.
If your course has more than 30 minutes worth of video tutorials, you will need to purchase a "Digital Products Add-On" Subscription. Each plan features different amounts of video storage and transaction fees so make sure to have a detailed read through to make sure you pick the best one for your business!

One advantage of hosting your videos directly on Squarespace is that you will be able to select a custom featured image to display on your video until your students click 'play' giving a highly professional look.

While hosting your videos on Youtube is much more affordable as you won't need to purchase an additional subscription for extra video storage, you won't be able to get rid of Youtube's branding on the video or add a custom feature image, giving your course a slightly less professional feel. That said if the extra branding doesn't bother you and saving a few extra bucks is sounding good, then we definitely recommend exploring this option!
👉 How to embed course videos in Squarespace from YouTube (free!)
If you don't have a video for this particular lesson, you can toggle off "show lesson video" at the top of the page.

Next, head to the Status tab to either Publish or Schedule your Lesson. Don't worry you can also leave it as a Draft for now!

Once you're done, click Save in the top left corner.
Customizing lessons
In the left hand sidebar, click on your newly added lesson to customize it further.
Click Edit in the top left corner.

Here, you'll be able to customize the lesson layout by hovering over the page and selecting Edit Layout in the top right corner.

In the pop-up menu, you'll be able to customize the lesson buttons for desktop and mobile, where the course navigation shows, the spacing between lesson elements, as well as the section colors.
The colors and button styles you'll be able to choose from are based on your site-wide Site Styles and you can edit these at anytime by clicking the paintbrush icon in the top right corner of your site.

Click outside the lesson settings menu to return to editing the page.
Hover over the video and click Edit Video in the top right to further edit the video displayed in the lesson.

You'll be able to select whether to show the video in the lesson, upload another video if needed, or add a custom featured image.

Click out of the menu and scroll down below the video.
Here, you'll be able to add any element you like!
Click Add Section and select a blank section, or a pre-designed Squarespace section, or a saved section that you have previously designed.


You'll be able to edit this section just like any other section on your Squarespace site!
👉 How to edit in Squarespace 7.1 with Fluid Engine - Best practices & tips
To add more sections, hover over the bottom of the page, and click Add Section.

How to add a Downloadable Workbook
It is quite common for some lessons to have a workbook attached.
👉 How to create a fillable PDF workbook (in Canva for free!)
To add a link to your workbook, hover over the lesson page and click on the +Add Block button in the top left corner.

In the pop-up menu, select Button.
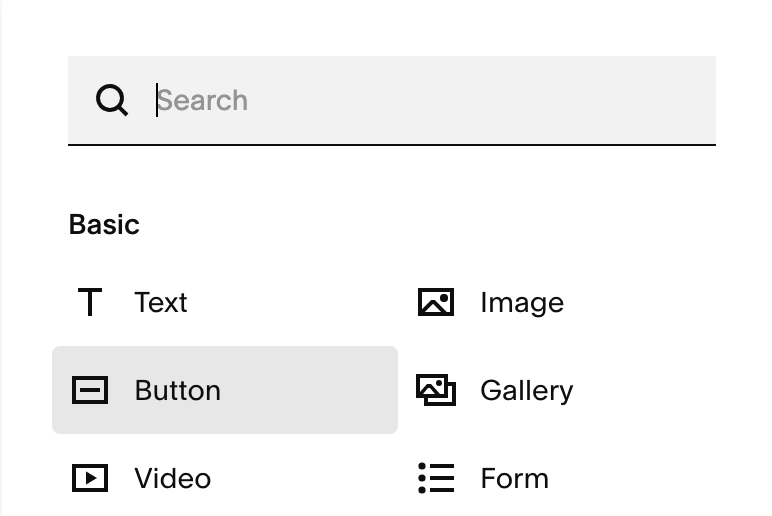
Double click on your new button block to access its settings.
Change the button text to something along the lines of "Download your workbook".

Then click on the cog icon next to Link. In the pop-up menu, go to the File tab.
Here you'll be able to select from a file that you've uploaded before or click Upload File to upload a new one.

Once you've selected your workbook file, click Save in the top left corner of the pop-up menu.
You can further customize the look of your button by switching to the Design tab.

Now, when someone clicks the button, the workbook will automatically be downloaded!
Keep adding and customizing your course content, then once you're done, head back to the Course main menu and let's keep going!

Step 3 - Customize the Course Overview
In the course main menu, click into Course Overview.

The course overview is your course's homepage which displays when a student first logs in. It provides a summary of all of the course content, including chapters and lessons. It features a progress bar so that your students know where they are up to, and a "Start Course" button which takes them straight to the lessons!
Squarespace also provides a demo page for the course overview, which you can either customize, or delete sections of to start over. Apart from the key Course Outline section which can't be deleted and is limited in its customizability, all other sections on the page work just like any other sections on your Squarespace website. You'll be able to add and customize as many sections as you like!

To customize the Course Outline section, hover over it and click Edit Layout in the top right corner.
You'll be able to toggle on or off various elements, customize the design, as well as pick a color palette.

Under Design, the most significant setting would be the Course Outline Layout. You'll be able to choose from List or Grid view, as well as a multitude of attached settings to customize the layout look!


List view

Grid view
Note! Only Published lessons will display in the Course Outline.
Step 4 - Customize the Course Styles
With the release of the Courses feature, Squarespace has added a number of new Site Styles settings that you can use to customize fonts and colors in your course!
Course Fonts
Click the paintbrush icon in the top right corner to access your Site Styles, then go to Fonts.
Scroll down to the bottom of the Fonts panel and select Assign Styles.

At the bottom of the Assign Styles panel, you'll find the font settings for the course overview (list and grid layouts) and the course lessons.

Click on the specific element that you would like to customize.

Then select either an existing heading or paragraph style, or go totally custom!


Course Colors
Click the paintbrush icon in the top right corner to access your Site Styles, then go to Colors.
Click on any color palette to edit it, then scroll down to the bottom of the panel to assign custom colors for course elements.


Click on any of the elements to customize the color.
In the pop-up menu, select from a current palette color, or add a totally custom color.


Step 5 - Set up Pricing Plans
Back in your course main menu, click on Pricing Plans and Create Pricing Plan.

Here, you'll be able to customize your course details further, including the title, description and benefits, which you'll see as a preview on the right hand side.

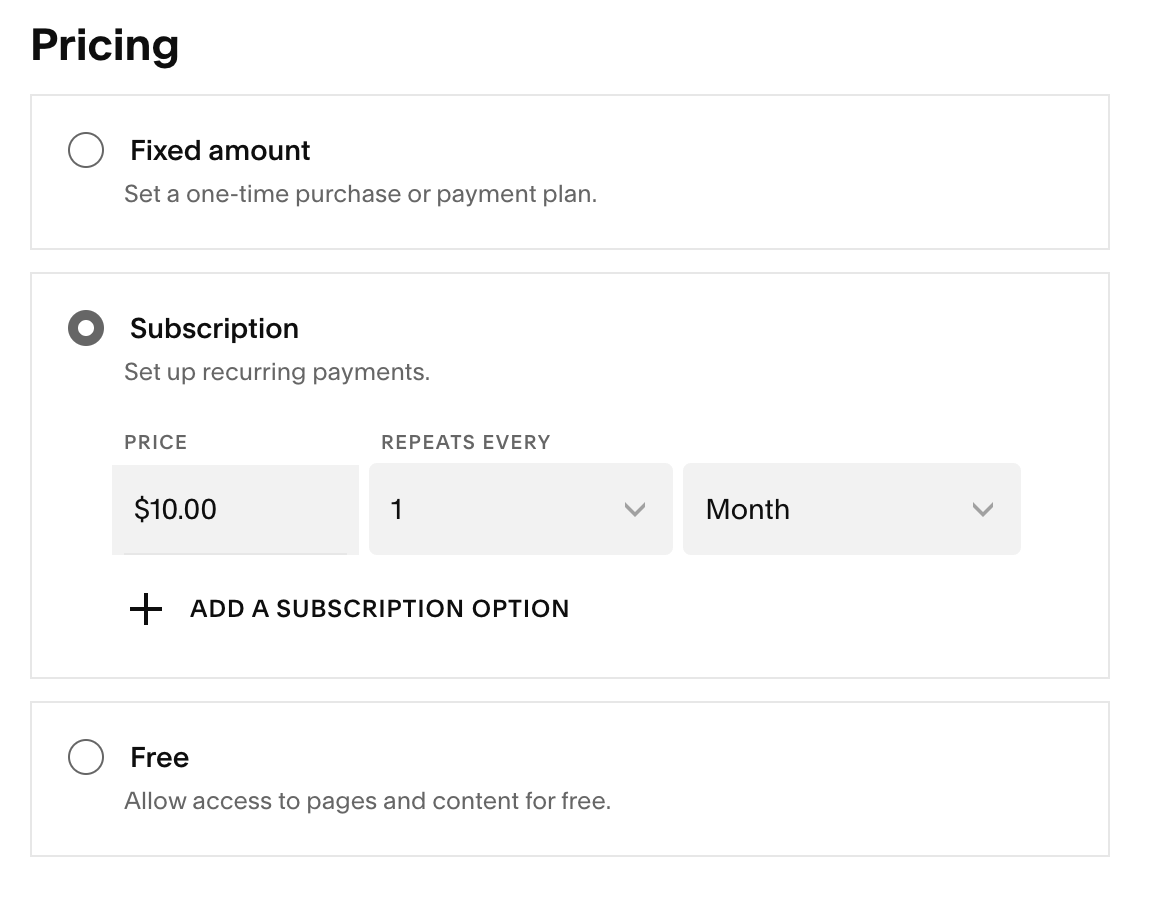
Scroll down to Pricing and choose Fixed Amount, Subscription, or Free.

Scroll down to the Included Products section to choose what your students will get access to when they purchase this plan. The course will automatically be selected, though you'll also have the option to add additional digital products as a bonus for example.

Finally, you'll be able to set up enrolment dates if you like.

Once you're happy with your Pricing Plan settings, click Create in the top right corner to save the Pricing Plan.
You'll be able to edit this Pricing Plan at anytime by clicking the Pencil icon on the right.
If you'd like to add another Pricing Plan option, click Create New in the top right.

Step 6 - Customize the Paywall
Once you've added a Pricing Plan, your course content will be placed behind a paywall which requires anyone landing on it to log in or purchase your course to access it.
You will now be able to see a Paywall option in the course menu.

The Paywall is quite limited in terms of customization, though you'll be able to use the settings on the left hand side to customize the headline, description, whether you would like to display the pricing plan or not, and whether the course overview page is also hidden behind the paywall.

Once you're happy with the look of your Paywall, click Save in the top left hand corner.
Step 7 - Create a Sales Page for Your Course
Now it's time to sell your course! And for that, you need a Sales Page.
A sales page is basically a regular website page with the sole purpose of bringing in sales. It should be filled with strategic copy which resonates with your potential customers, answers all of their questions about the course, and of course a link to where and how they can purchase it.
Luckily, this is oh-so-easy to set up in Squarespace, and we've got a very handy tutorial showing you exactly how to create your own sales page in Squarespace here.
You can also use one of our professionally designed Sales Page Templates to make this process a whole lot quicker.


Or use one of Squarespace's own pre-designed sales pages. To do this, click on the + icon next to Not Linked pages and select Page Layouts.
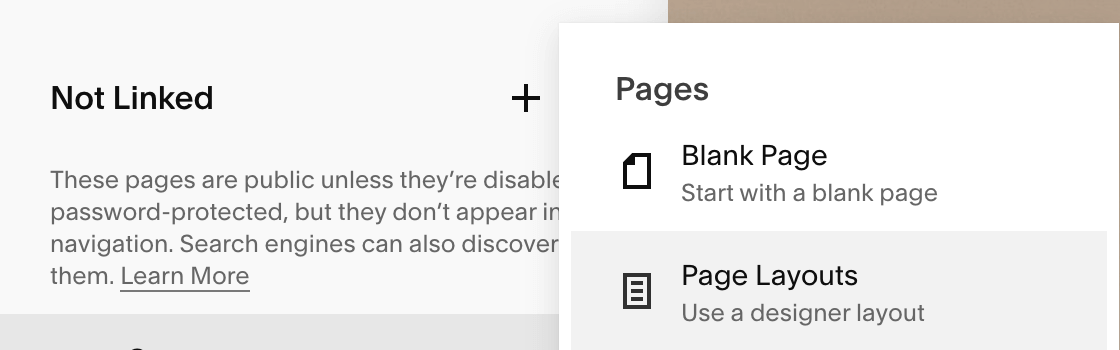
In the pop-up menu, scroll down to the Digital Products tab and select one of the templates.

Customize the sales page just as you would any other page on your Squarespace site!
Add a digital product block to your sales page
Regardless of which kind of sales page you end up choosing, whether you build one yourself or pick a template, you will need to add a Digital Product Block somewhere on your sales page.
This will be linked directly to your course payment plan, allowing your customers to purchase right then and there, greatly streamlining the whole process!
Click Edit in the top left corner of your sales page and scroll down to where you would like to add your pricing block.
Click +Add Block in the top left corner of the section and scroll down to Business and select the Digital Product block.

Double click on the block to access its settings.
In the Content tab, select the course pricing plan that you would like to display. All the details that you added into the pricing plan in Step 4 will then be pulled into the block content! To customize this information, head back to the Pricing Plan tab in your Course main menu.

In the Design tab, customize the look of the block. You'll be able to change the alignment, choose which elements are displayed or not, and the button text.

Once you're happy with its look, click out of the menu and remember to click Save in the top left corner!
Step 8 - Set up a Welcome Email
Go to Selling > Selling Tools then scroll down to the "Manage your storefront" section and click into Customer Notifications.

Here, you'll be able to customize the overall look of your emails to make them look extra on-brand by clicking Edit Email in the top right corner.
Once you're done, click on Digital Products in the left hand sidebar to set up a welcome email for your course.

Click Edit Email in the top right corner to edit the welcome email template.

This will bring you to a simple editor where you'll be able to customize the email text, add blocks, edit links, and more!

Remember to send yourself a test email to make sure everything is looking just as you'd hoped by clicking the Send Test button in the bottom right corner.
Note! The same welcome email will be send to all the courses that you create on your site so make sure to keep it general. You can also use placeholder text that will be automatically filled in depending on the information that you add in a particular pricing plan by clicking the last icon in the text toolbar.
This type of text will have a dotted line below it. You'll be able to choose from options like the customer's name, the course name, or the site title.

Step 9 - Connect a Payment Processor
In order to sell your course, you'll first need to connect a payment processor (like Paypal) to your website so that you can actually receive payments.
In your website's main menu, go to Settings > Selling > Store Payments.
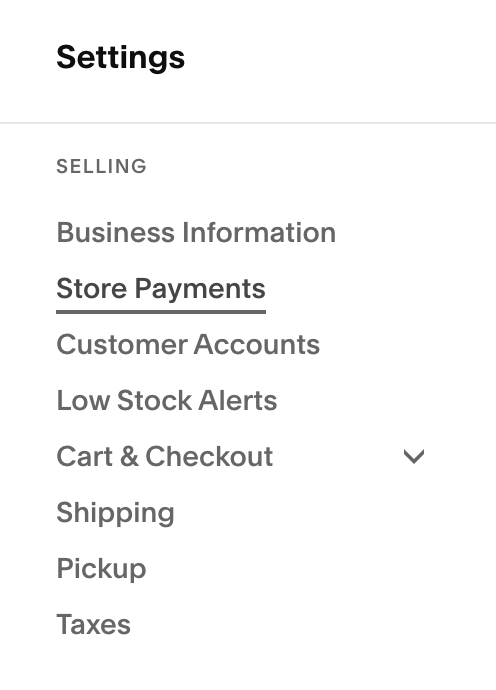
Here, you'll be able to connect your Stripe and/or Paypal accounts. Click Connect and follow the prompts!

Now when your site visitors click on the Sign Up button on your sales page, they'll be taken to a Checkout page where they'll be prompted to create login details to access the course, enter their personal details, and of course, make their payment!
Voila! You've set up your course and are ready to sell!
We hope this tutorial was helpful and can't wait to see all of the brilliant courses you create.
For more Squarespace tutorials, check out the posts below! 👇
5 awesome features you can add to ANY Squarespace website to give your business a boost!
How to create freebies that actually grow your email list
How to remove the header and/or footer from a single page in Squarespace 7.0, 7.1 + Fluid Engine
How to add Google, Airbnb, and Facebook reviews to your Squarespace site
If you liked this post, Pin it to Pinterest! 👇🏻
